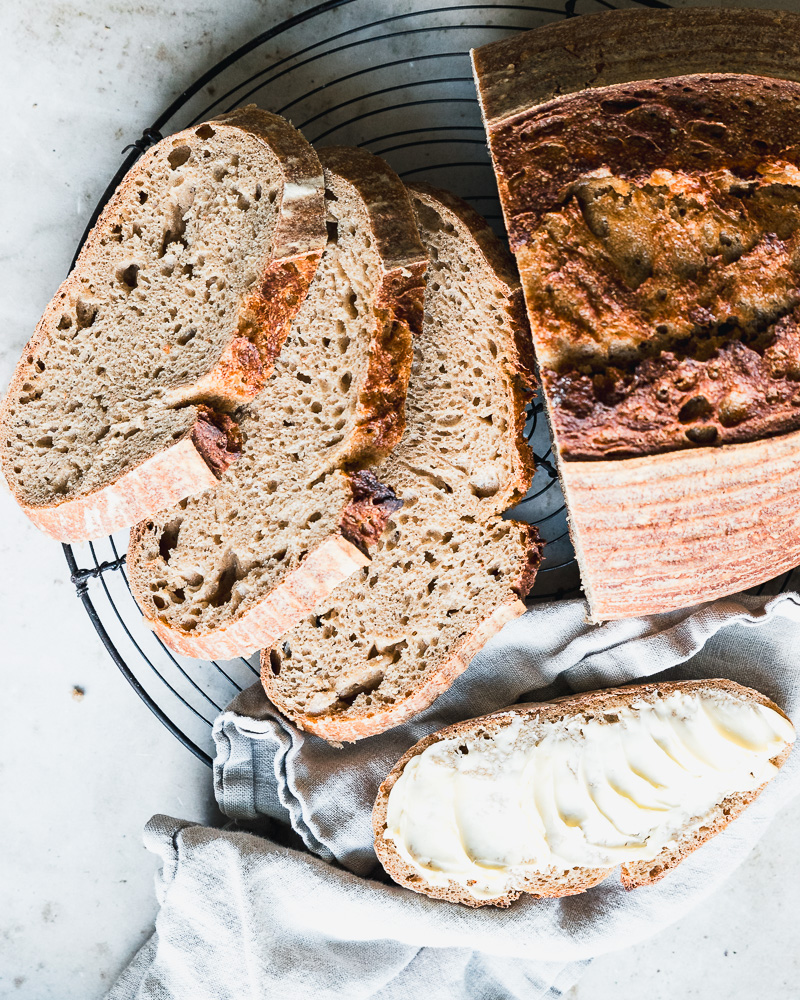
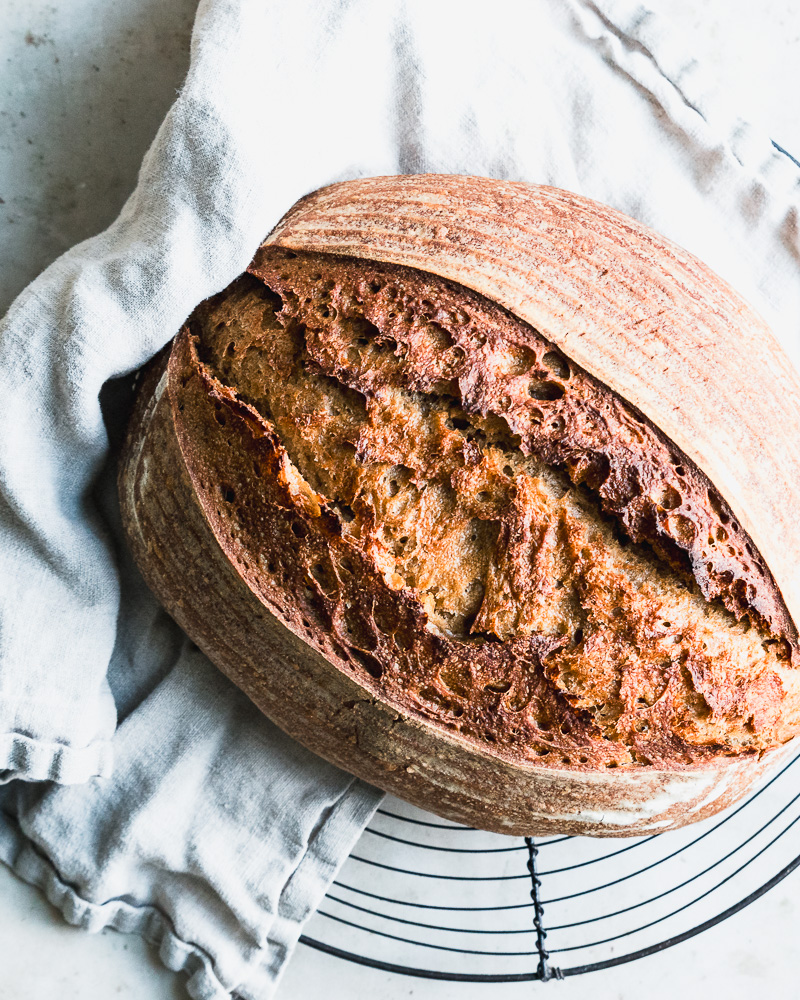
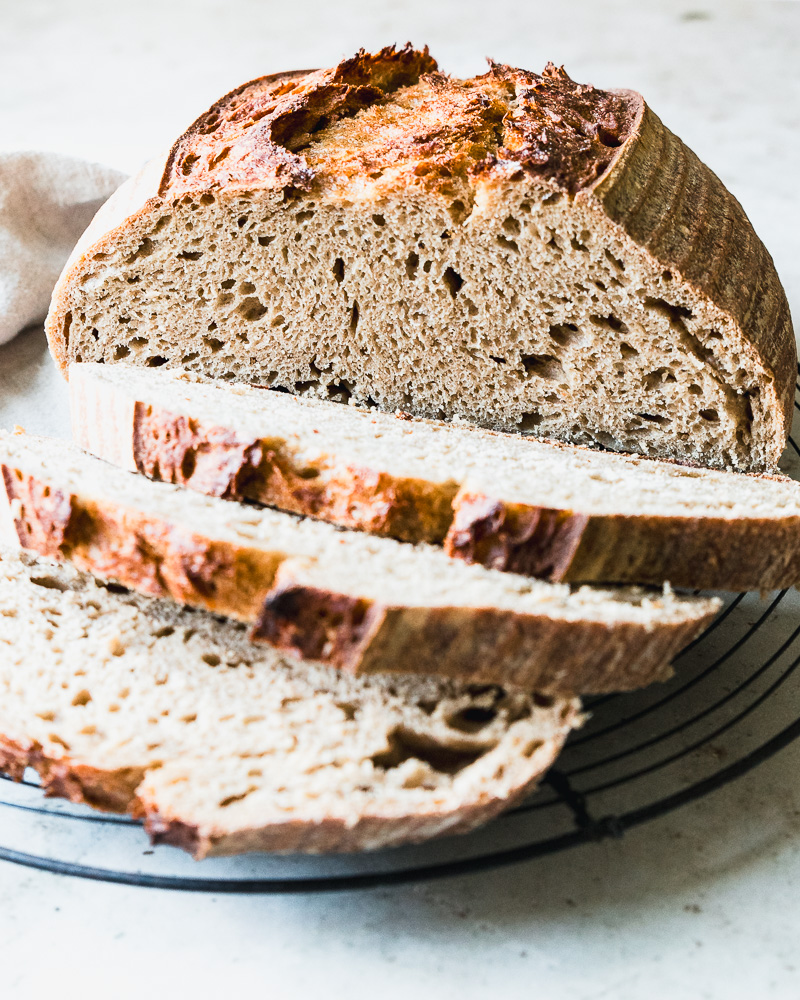
This easy Sourdough Rye Bread Recipe results in a loaf with a tangy, complex flavor, a beautiful crackly crust, and a springy, moist, tight crumb (perfect for sandwiches!). The dough comes together in a flash in the stand mixer but you can also perform stretch and folds if that is the method you prefer. My recipe is lower hydration than most, making it very easy to work with and nearly foolproof!
Recipe Background and Details
If you are new to sourdough, be sure to check out my Easy Sourdough Starter Guide.
Since perfecting this low hydration Sourdough Rye Bread recipe, it has become almost a weekly staple in our house. It is perfect for toast, sandwiches, dipping into soups, serving alongside eggs, feeding to teething toddlers, etc. I love how rye sourdough tastes - it is like a nuttier, more complex whole wheat flavor and it really puts the sour in sourdough. It is so tangy and delicious! Toasted, smeared with salted butter, and topped with homemade jam is my idea of perfection.
And the lower hydration of this dough is very intentional and here's why: First, it is so much easier to work with. Second, I wanted a tight crumb. When I have a slice of toast, I want the butter to make it into my mouth, not dribble through my bread and down my arm. Similarly, if I make a grilled cheese or other sandwich, I want my toppings to stay in my sandwich, not fall through the larger holes that a higher hydration dough often produces. Don't get me wrong - I love those beautiful bubbly loaves and I have some higher hydration recipes in the works, but for this particular sourdough rye loaf I knew I wanted to keep it lower hydration so I stuck in the low 70% range.
I love serving this hearty bread alongside an equally hearty soup - my favorites are Moldovan Borscht, Italian Sausage Minestrone, and Brothy Beans with Fennel and Parmesan.
Jump to:
Ingredients
As with most sourdough recipes, the ingredient list is pretty minimal.
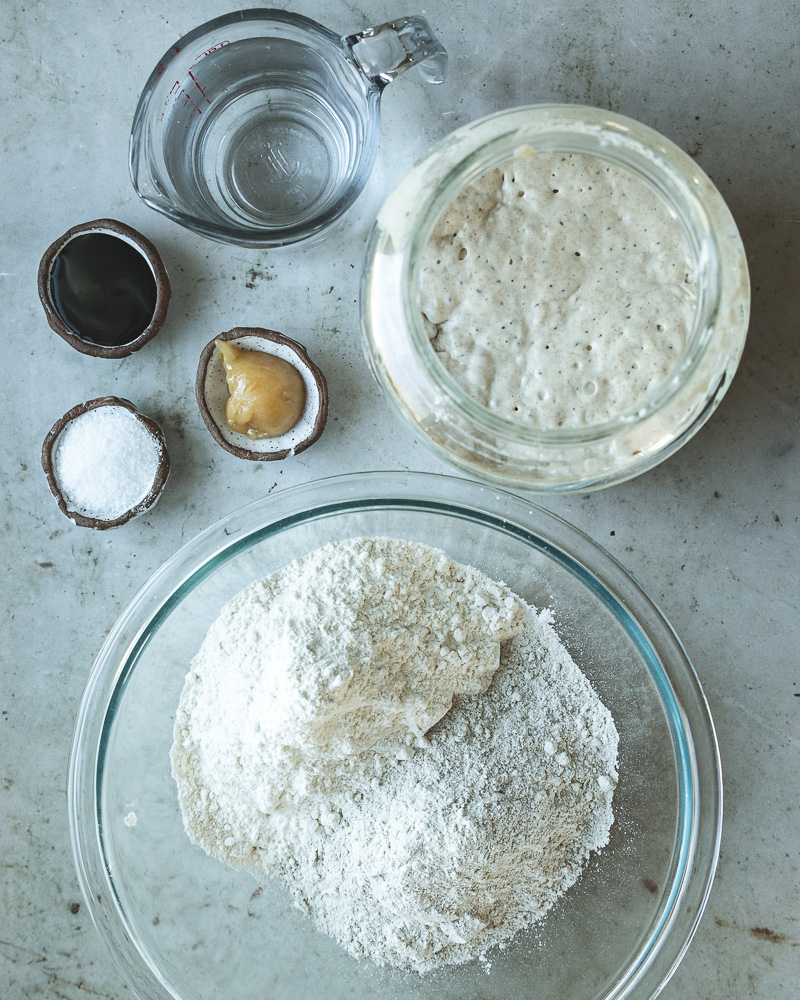
- water: filtered or clean tap/well water is fine. If you have heavily treated water, leave it out overnight so the chlorine can dissipate before proceeding with this or any sourdough recipe.
- honey and molasses: I know using both might seem a little extra, but I really do like the combination. But you can use one or the other if you don't want to bother with both.
- ripe, bubbly sourdough starter: You'll want to feed your starter 4-12 hours before making this dough so that it is at its peak.
- rye flour: I use King Arthur Medium Rye, but you can use your favorite.
- bread flour: I use King Arthur Organic Bread Flour. I have made this with all purpose and it is a very difficult dough. If you use all purpose instead of bread flour, you will need to add a bit more flour or a little less water to make the dough workable. And you will have a less chewy, springy loaf.
- salt: I always use Diamond Crystal Kosher Salt.
See recipe card for quantities.
Step-by-Step Instructions - Stand Mixer or Stretch and Fold
Yes, you can make sourdough in a mixer!
This was the first sourdough recipe I was brave enough to make using my stand mixer. Rye flour can be sticky to work with and I decided to just let my mixer do the work after making this manually a few times. It really blew my mind and changed my whole outlook on sourdough! Instead of spending a few hours performing stretch and folds, this dough mixes for about 10 minutes in the stand mixer before a standard bulk fermentation period. I have the kind of hands that sourdough likes to stick to, so this stand mixer method is seriously life changing!
Stretch and fold
If you prefer to perform stretch and folds, you will do them every 15 minutes for the first hour and then perform 3 more 30 minutes apart. I recommend keeping a dish of water nearby - rye dough likes to stick to your hands and wetting your hands helps a bit.
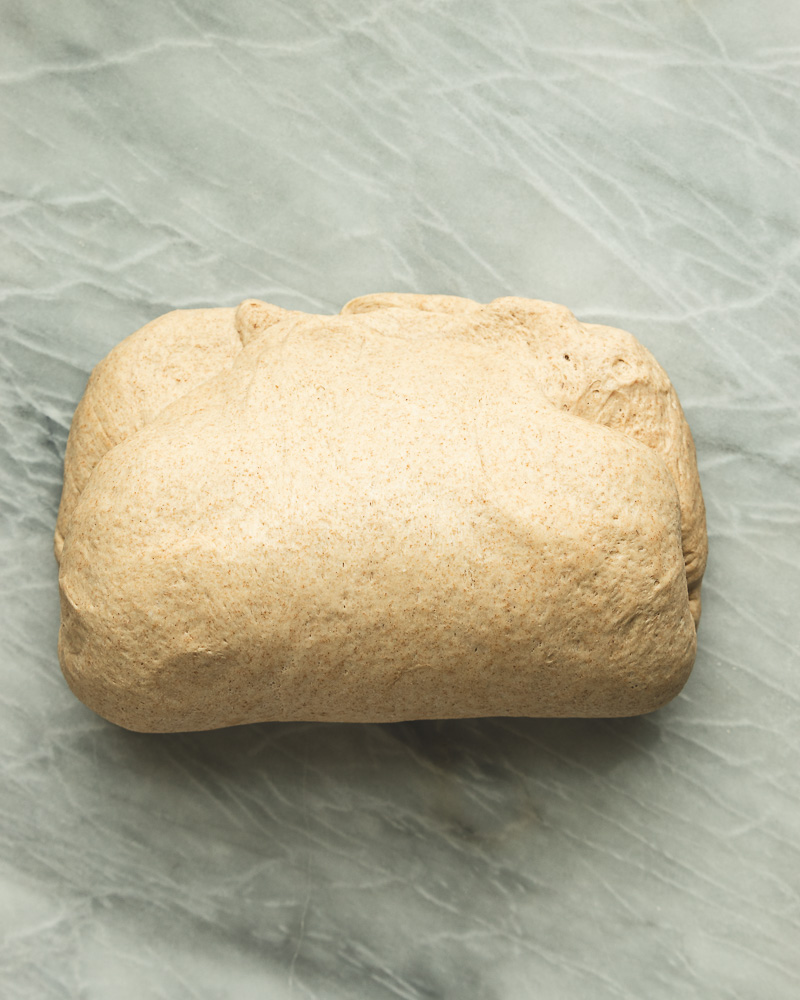
Mixing the dough:


Mix wet ingredients in bowl of stand mixer then add flours and salt. Mix for a few seconds until a sticky, rough dough forms. Cover and rest for 30 minutes before kneading at a low-medium speed for about 10 minutes or until dough pulls away from bowl and becomes smooth. When dough is done kneading it will still be sticky. You should be able to pull it up a few inches without the dough breaking as you see in the photo below. 10 minutes was the sweet spot for me - I use a KitchenAid Professional 6 Qt mixer on speed 2 for the first few minutes and then speed 3 for the last few.
Bulk ferment:


Allow dough to bulk ferment until risen by about 25% - you do not want this dough to double or it will almost certainly be over-fermented.
Shaping and cold ferment:


Dump dough onto work surface and shape to fit your banneton or vessel of choice. Flour the surface well and place seam side up.
Here is a good video on shaping until I get one of my own recorded: Beginner Sourdough Bread Shaping Techniques.
Allow to sit at room temperature for 20-30 minutes before covering and placing in refrigerator for 12-24 hours. I prefer 24 for more rising time as well as more of a sour flavor.
Scoring and baking:

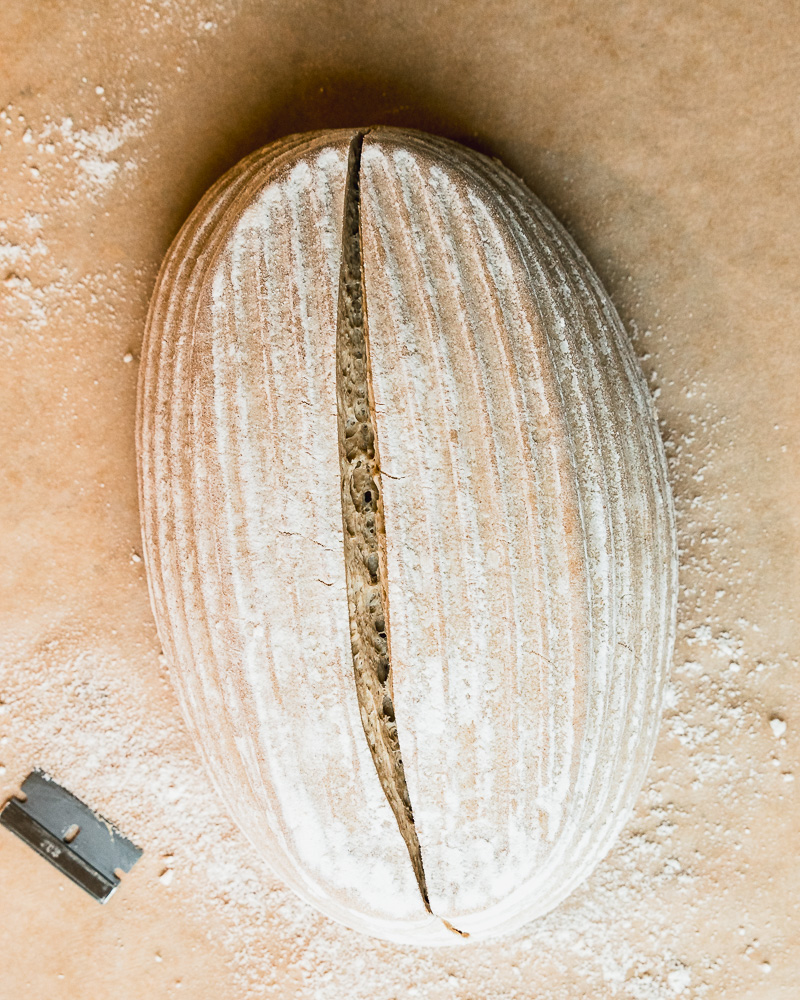
After 12-24 hours, remove from refrigerator (dough should be noticeably risen), tip out onto parchment, score, and bake for 30 minutes covered in preheated cast iron dutch oven - add a couple ice cubes to the Dutch oven to create extra steam and help with oven spring if desired. I do this occasionally but not always. Remove lid and bake for an additional 10-15 minutes lightly tented with foil to avoid over browning if desired. I like to place a small rack/trivet under my loaf after the first 30 minutes to prevent the bottom from getting too brown as well.
Top Tips
- Wet hands are your friend when working with this and any sourdough - keep a small dish of water nearby
- Add a couple ice cubes to the hot Dutch oven and clamp on the lid to trap steam. This will help with oven spring and forming a nice crust on the bread.
- Place a small rack or trivet under the loaf after the first 30 minutes to prevent the bottom from browning too much. I use the little round wire rack that came in my Instant Pot.
- Cover loaf loosely with foil for the last 10-15 minutes to prevent the loaf from over-browning if desired.
- Allow loaf to cool for several hours or overnight to ensure the best texture. This is important with all sourdough loaves but especially with rye.
- If you are new to sourdough baking, remember that it is a learning process but a very fun one. The more you bake the more confidence you will gain. I am still learning so much and I've been baking with sourdough for about 5 years. Even my flattest, worst loaves were still edible.
Substitutions and Variations
I do not add any seeds or flavorings to mine, but you can if you want more of a deli-style rye bread.
- Flavorings - add caraway seeds, poppy seeds, and/or onion flakes for a true NY deli experience.
- Rye - I use King Arthur Flour Medium Rye, but you can use a darker, coarser rye if you prefer just know that this will change the hydration a bit and you will most likely need to adjust.
- Bread Flour - I have made this with all-purpose instead of bread flour and it is a lot stickier and quite a bit harder to work with. It also does not produce as tall a loaf. If you happen to try it with all-purpose, I recommend reducing the water a bit or adding a bit more flour.
- Honey and Molasses - After making many loaves with one or the other I landed on the combination but of course you do not have to use both. You can use all honey or all molasses. The molasses gives a little bit of a darker color and it brings out more of a grainy flavor (if you've ever smelled horse feed with molasses you know what I mean!). The honey is more subtle than the molasses. Both are lovely choices and you can't go wrong.
- Shaping - You can make this in a batard (oval) shape or a small boule (round) shape. If you don't have a banneton basket, use a bowl lined with a well-floured tea towel. I'm planning on trying to bake this in a loaf pan - will update if/when I do!
Equipment
Here are some tools that make this recipe and sourdough baking in general much easier:
- Large Dutch oven with lid
- Stand Mixer with dough hook
- Dough Scraper - a soft plastic one is my favorite for scraping sticky dough out of bowls and for assisting with shaping loaves.
- Banneton basket: I use a batard basket for this loaf but you can use any shape you like. You can also use a bowl lined with a well-floured tea towel.
- Parchment Paper: Essential for lifting the dough into the hot Dutch oven. You can also use a silicone bread sling.
- razor blade or baker's lame: you can also use a very sharp knife or bread knife to make a quick slash.
Storage
Store the cooled bread covered at room temperature for 3-5 days. The bread can also be frozen - I recommend slicing before freezing so you can pull out just a slice or two as needed.
Print
Sourdough Rye Bread
This easy Sourdough Rye Bread has a tangy, complex flavor, a beautiful crackly crust, and a springy, moist, tight crumb (perfect for sandwiches!). The dough comes together in a flash in the stand mixer but you can also perform stretch and folds if that is the method you prefer. My sourdough rye bread recipe is lower hydration than most, making it very easy to work with and nearly foolproof!
- Total Time: 24 hours
- Yield: 1 loaf
Ingredients
284 grams water (1 ¼ cups)
200 grams active, bubbly sourdough starter (about 1 cup)
160 grams medium rye flour (1 ½ cups)
300 grams white bread flour (2 ¾ cups)
10 grams kosher salt (2 teaspoons)
21 grams honey (1 tablespoon)
21 grams molasses (1 tablespoon)
Instructions
Stand mixer method
- Mix water, honey, molasses, and starter in bowl of stand mixer. Add flours and salt. Mix with dough hook for a minute or so until a sticky, rough dough forms. Leave covered for 30 minutes.
- After 30 minutes, continue kneading on speed 2 with dough hook for 5 minutes. Scrape sides and continue for 5 more at speed 3 until dough is smooth and pulls away from sides and bottom. It will still be sticky.
- When dough has finished kneading, cover and allow to bulk ferment at room temperature for 2-3 hours until dough has risen by about 25%.
- When dough has risen, dump onto floured work surface, shape to fit your banneton or vessel of choice. This can be sticky so just be patient, use extra flour or damp hands, and a bench scraper can be really helpful.
- Flour banneton and dough very well. Place shaped dough in banneton seam side up. Cover and refrigerate for 12-24 hours.
- An hour before you are ready to bake, preheat oven to 450 degrees F with covered Dutch oven inside for 1 hour.
- When oven is preheated, remove dough from refrigerator, tip out onto parchment, score with a razorblade, lame, or very sharp knife.
- Immediately transfer dough to preheated Dutch oven using parchment to lift and lower it into the pan. Cover and bake for 30 minutes at 450 degrees F.
- After 30 minutes, place a small trivet under loaf and bake uncovered for 10-15 minutes. Cover loosely with foil to prevent over browning if desired. Loaf is done when it reaches 200-210 degrees F.
- Remove loaf from Dutch oven and allow to cool on a rack uncovered for a 4-6 hours or up to overnight.
Stretch and fold instructions:
- Mix all ingredients in a large bowl until a shaggy dough forms. Leave to rest for 30 minutes. After 30 minutes mix once more to ensure all ingredients are well combined.
- Next, you will perform 6 sets of stretch and folds over the next couple hours. Perform the first 2-3 at 15 minute intervals and the last 3-4 at 30 minute intervals. Leave the dough covered and in a warm spot in between each set.
- After all stretch and folds have been completed, cover dough and allow to bulk ferment at room temperature for 2-3 hours until dough has risen by about 25%.
- Proceed with instructions 4-10 as written above.
Notes
I have given the cup measurements but just be aware that weight measurements will always be more accurate.
If you want to make this even easier to work with you can reduce the water by 60 grams (¼ cup) and you will have a much less sticky dough and an even tighter crumb once baked. You won't get a very dramatic oven spring but it still makes a really good loaf.
Your bulk fermentation time could be much less or much more than mine. It takes about 3 hours in my 70 degree kitchen and I often place my dough in my oven with the light on. Rye dough rises much faster than other doughs so keep a close eye and shape your loaf as soon as the dough has risen by 25%.
- Prep Time: 4 hours
- cold ferment: 12-24 hours
- Cook Time: 40 minutes
- Category: sourdough
- Method: baking, sourdough
- Cuisine: American
FAQ
Rye flour is wonderful for sourdough bread! It enhances the sourness and has such a unique and complex flavor profile. IT does have less gluten so it takes some getting used to and you will want to use it alongside a regular bread flour to avoid getting a dense, gummy loaf.
Rye sourdough simply means you have either fed your starter with rye flour and/or you have created a loaf of sourdough bread using rye flour. Rye flour is great for sourdough but it does have less gluten and can create a very sticky dough. It might take some getting used to, but I highly recommend rye sourdough.
No, in fact rye sourdough is almost always faster to rise. Sourdough loves rye and if you feed your starter with it you will see by how quickly it bubbles up and doubles in size. The same is true for bulk fermentation and rising times for rye-based sourdough breads. I have found they only take 2-3 hours in my kitchen whereas a white loaf would take up to 6 hours.
Rye flour does create a more sour flavor profile in sourdough which is one of the reasons I love adding it to my sourdough recipes. It will really give your starter a boost and add flavor and complexity to your breads and other doughs.
More Sourdough Recipes
Looking for more sourdough recipes? Try these:


Amy says
How much dried onion flakes and caraway seeds should I add?
anita | wild thistle kitchen says
Hi Amy. This really depends on your preference. Anywhere from 1-2 tablespoons of caraway seeds and 1-3 tablespoons of dried onion flakes are common amounts used in most rye bread recipes. I hope that helps! - Anita
Naomi says
I am curious why there is so much starter in this recipe, 275 grams. Most other rye bread recipes have starters ranging from 70 to 100 grams for rye breads, even for a 50/50 rye and wheat flour mix and also for 100 percent rye flour.
anita | wild thistle kitchen says
Hey Naomi. That's just how I developed this recipe - 1/2 cup to 1 cup of starter is pretty standard and the higher amount helps the dough rise a bit faster. Feel free to reduce the starter if you'd like but make sure to account for that in the overall hydration and also allow a bit more time for rising. Keep in mind, you can lower the starter amount in almost any sourdough recipe and just increase your rising times. Let me know if you have any other questions. Thanks - Anita
Sheila says
Once I tried your English muffin recipe, I knew I had found my sourdough mentor! You sandwich bread recipe is the best of three I’ve made so far! My rye bread is fermenting in the refrigerator now; I can’t wait to try it (but I will!!) thank you ; I’ve only been at this a month and I’ve had one fail so far, but still edible!
Andrew Armstrong says
I made this today. My dough in the mixer was really wet and would not form a ball so I had to add some additional flour a tablespoon at a time until it started to form a ball on the hook. I didn’t do the cold proof but just went ahead and let it rise in the banneton for 2 hours. Very happy with the results but will try an overnight cold proof next time so it will develop a more pronounced sourdough flavor. It’s still really good. Thanks for the recipe and tips.
anita | wild thistle kitchen says
Hi Andrew. I'm glad you enjoyed this recipe. This one is a bit sticky and won't really form a ball but it should pull away from the sides and bottom when it is done mixing so adding a bit of flour as needed to achieve that is totally fine. Again, I am so glad you liked it. Thanks for your feedback! - Anita
Richard says
Hi Anita,
I made your Sourdough Rye bread and followed your recipe exactly, but it turned out a bit gummy on the inside. It looks just like the loaf in your pictures on the outside, and the flavor is really great - it’s just gummy. I don’t think I let it overproof, and I baked it just as you suggested. Any ideas what I may have done wrong?
anita | wild thistle kitchen says
Hi Richard, Thank you for giving my recipe a try. Rye bread can sometimes be a bit more moist or gummy simply because rye has a weaker gluten structure. But in general, sourdough can be gummy for several reason - such as not enough gluten development, over-proofing, uneven oven temp, and not allowing the loaf to cool properly before slicing. I do still get a gummy loaf now and then and I think most often my mistake is not letting it cool long enough or pulling it from the oven before it's fully baked. Something else you can try if you do make this rye bread recipe again is to use a tad less rye and a bit more regular flour as well as a tiny bit less water. It could just be a difference in starter hydration as well. So many possibilities! haha - The fun of sourdough baking. But even when I get a gummy loaf, it still makes excellent toast. Thanks again for trying the recipe and for your feedback. - Anita
Richard says
Wow, thanks for the immediate reply! I’m determined to keep trying. I really enjoy your discard English muffins and sandwich bread. Those are popular around here!
anita | wild thistle kitchen says
Of course! I hate to leave anyone hanging - especially when it comes to recipes. I know how frustrating that can be. Thank you for letting me know! I'm so happy you enjoy those recipes. They are staples in our kitchen as well. 🙂