So you've put in the time and work to establish an active, bubbly sourdough starter (or maybe you bought one or were gifted one) and you're wondering, "what now?!" In this post I will teach you what to do next to ensure a long-lasting relationship with your brand new kitchen companion. I'll not only walk you through how to feed and maintain your sourdough starter whether you are baking once a day, week, or month, but I'll also answer all of your burning sourdough starter FAQs. Think of this as your sourdough starter manual/reference guide. This post is packed with info so buckle up and enjoy!
Whether you are here from my How to Make a Sourdough Starter guide, or you crash-landed here from the vast interwebs, I wholeheartedly welcome you and I hope you'll find this post informative and helpful.
If you are new to my page, I love sharing sourdough and sourdough discard recipes and I have a very laid-back, inclusive, and no-nonsense attitude when it comes to sourdough. I love encouraging and teaching others how to begin their sourdough journeys. I send out a weekly newsletter which is actually where I gathered many of the faqs in this post. Sign up here for weekly recipes and sourdough tips: WTK Weekly Newsletter
I believe that anyone can make a sourdough starter and eventually a beautiful loaf of Artisan Sourdough Bread without any special tools, fancy techniques, strict rules, or prior experience.
In this post we will focus on feeding and maintaining an established starter while also troubleshooting common sourdough starter issues and answering faqs. I plan to update this post frequently with new questions that come up, so please leave your questions in the comments section below if you don't see them addressed in this post.
Jump to:
- What You Need: Equipment and Supplies
- How Often to Feed Your Sourdough Starter
- What Type of Flour to Feed Your Sourdough Starter
- What if you leave your starter in the refrigerator for a long time?
- The Feeding Process: Step by Step
- Feeding Ratios Explained
- Sourdough Starter FAQs and Troubleshooting
- How to Feed and Maintain a Sourdough Starter (recipe)
- Put your starter to use with my Sourdough and Sourdough Discard Recipes
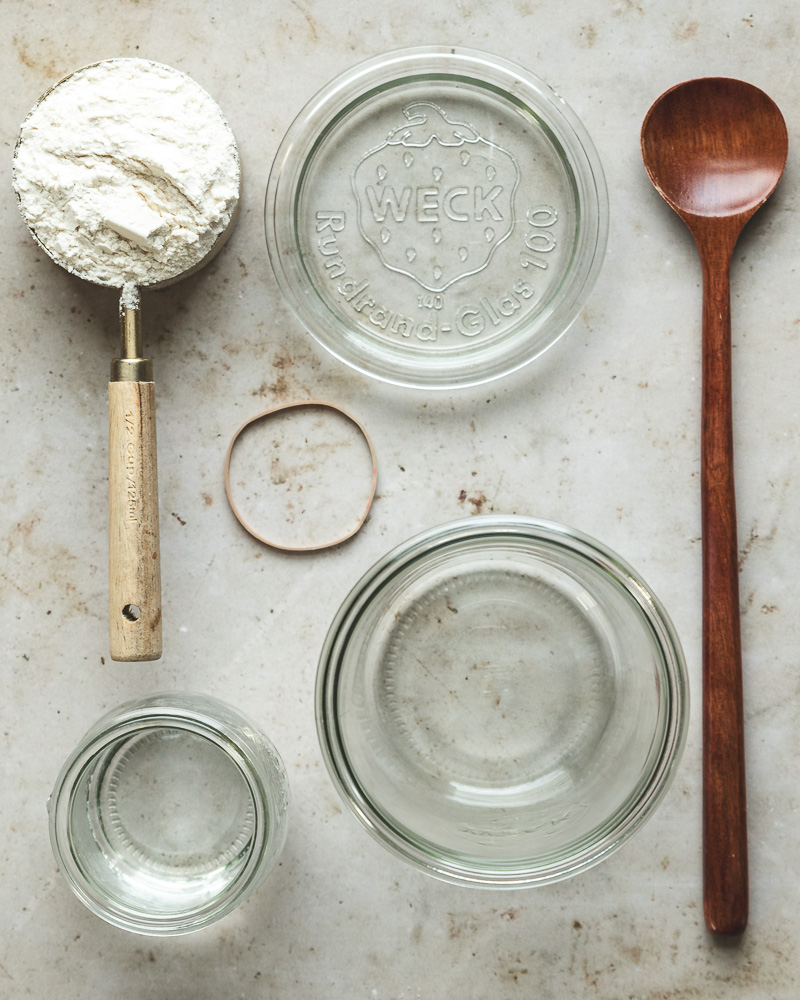
What You Need: Equipment and Supplies
- An established sourdough starter - whether you have purchased a starter, been gifted one from a friend, or you made your own, you'll need one for this guide to be useful. If you don't have one yet, you can start today with some flour and water and have one in 9-14 days using my How to Make a Sourdough Starter guide.
- Flour: I prefer unbleached all purpose or bread flour for feedings but we will go more in depth into flour varieties below.
- Water: room temperature non-chlorinated water
- Jar: a sturdy glass jar is my choice. I prefer Weck jars for their straight sides but you can use any jar or container you prefer - it does not have to be fancy.
Optional items that come in handy
- Scale: Not essential but it can come in handy if you are more of a stickler.
- Rubber Band: for marking the starting point so it is easier to check for doubling.
How Often to Feed Your Sourdough Starter
This will depend on how often you plan to bake so I'll break it down into those categories.
- If you bake every day or every other day: you'll leave your starter on the counter at room temp and feed it daily after each use.
- If you plan to bake once a week, you'll store your starter in the refrigerator. The night before you want to bake, pull the starter out of the refrigerator, discard if needed, and feed.
- If you plan to bake once a month or very infrequently, you'll still want to give your starter a feeding every week or two to keep it lively. And then the night before you plan to bake, you'll pull it from the fridge and give it a good feeding so it will be ready for you the next morning.
What Type of Flour to Feed Your Sourdough Starter
There is no right answer here, but I will tell you what has worked best for me. Over the years I have used practically every flour you can imagine in my starter at one point or another. But for regular, predictable feedings I prefer to use King Arthur Organic Bread Flour because it creates a nice, strong starter with great webbing that holds at peak for quite some time.
When you use whole wheat flours or freshly milled flours to feed your starter they will ferment and fall much more quickly than a plain white bread flour. This doesn't mean you shouldn't use them - just be aware that you'll have to act faster to use them when they are at that perfect peak stage.
I have little kids dictating my schedule, which is why I like a stiffer starter - it's nice to know I can be a little flexible with my timing and my starter will hold on for me until I'm ready.
What if you leave your starter in the refrigerator for a long time?
Life gets busy and sometimes despite our best intentions, we ignore and neglect our beloved starters. If this happens, don't fear - you do not need to start all over again. As long as there's no mold, you can revive your starter after months (and even years!) of fridge time. It will take a few feedings to come back to life, but I promise it will and I do speak from experience. side note: I have never had a starter go moldy - I know it happens but in all my years I've never seen it.
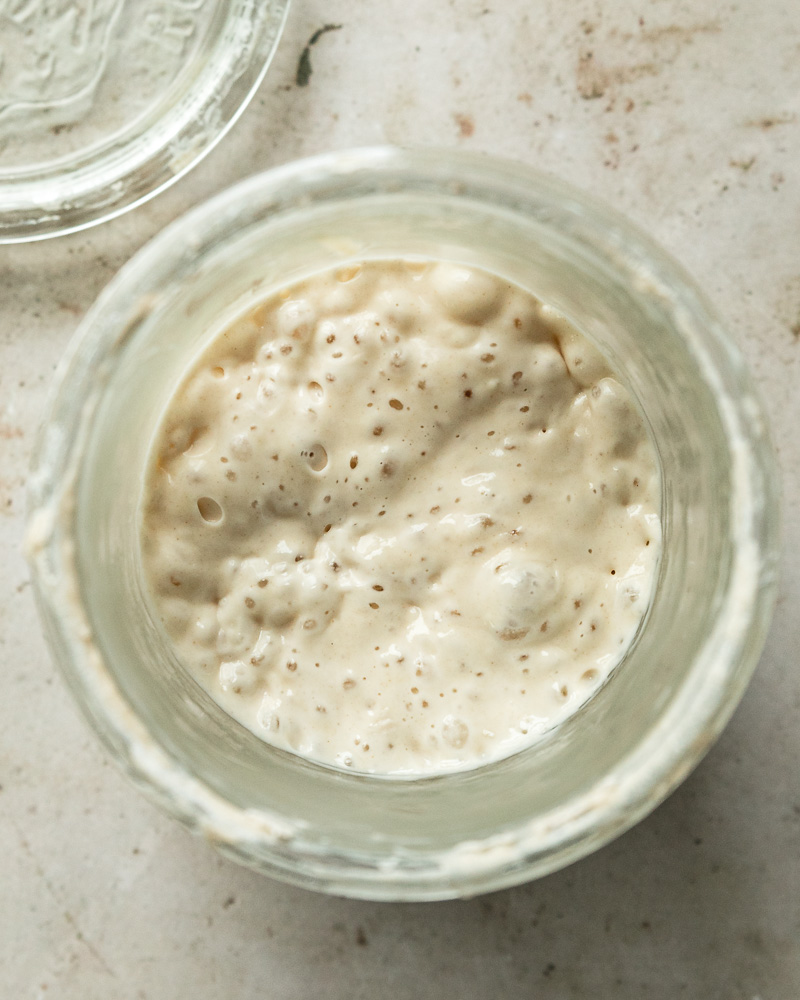
After a long time in the refrigerator, your sourdough starter will undoubtedly have a layer of dark liquid on top - this is called hooch and it is a sign that your starter is very hungry. You can simply pour it off and proceed with feeding. When you pour it off you will see a bumpy surface that almost looks like craters. These are called hooch volcanoes and they are totally normal but are often mistaken for mold.
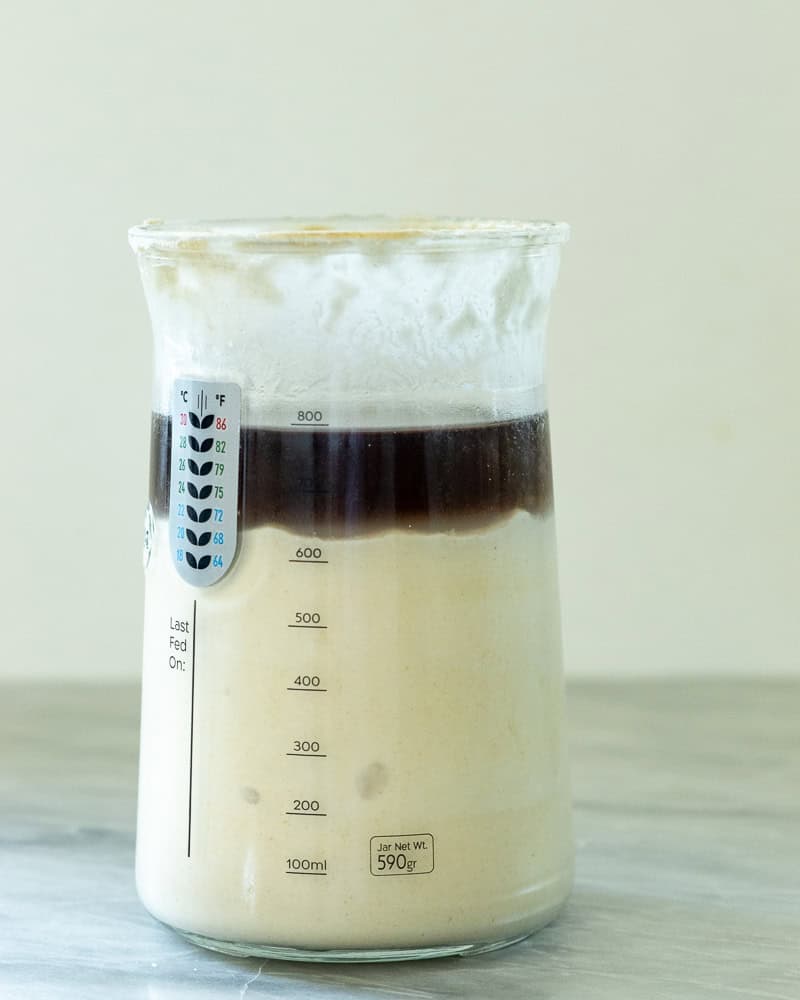
Sourdough starter with a layer of hooch on top
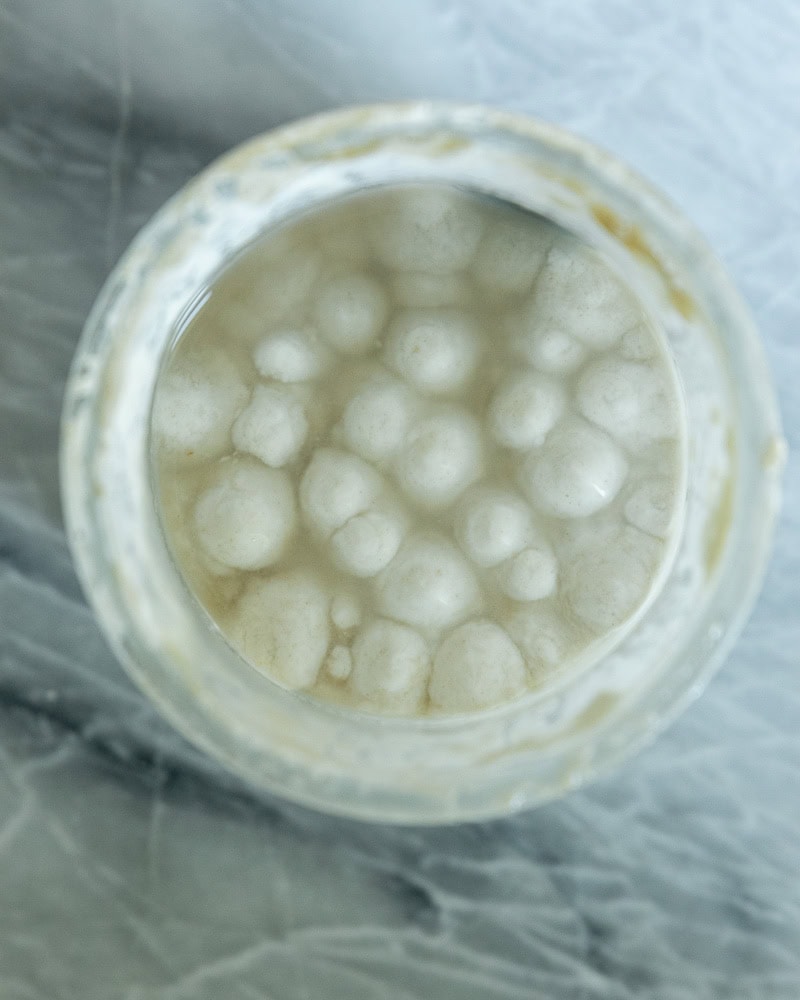
Sourdough starter with hooch volcanoes on the surface
Once you pour off the hooch and discard, you'll treat it like any other feeding, but you'll just want to discard and feed again after 12-24 hours and repeat usually about 3 times until it doubles consistently and builds up strength. This will depend on various factors including length of time in fridge, temperature of your kitchen, and the flour you're using so you'll need to be a little flexible and patient.
The Feeding Process: Step by Step
A basic 1:1:1 feeding regimen looks like this: place one part starter, one part water, and one part flour in a jar, mix well, cover loosely, and leave at room temperature until doubled in size.


I like to feed my starter at night just before I go to bed so I know it will be bubbly and peaked by morning and I can start a loaf or two when I wake up. So around 9 or 10pm I remove any excess starter so I only have a few tablespoons of starter in the jar. To that I add water and then flour and stir until it is a very thick, pasty consistency. I like a stiffer starter these days so I do about a 1:5:5 ratio or 10 grams starter, 50 grams flour, 50 grams water. I never use a scale anymore when feeding my starter because I know the consistency I like. Then I place a lid loosely on my jar and leave it on the counter overnight.


Feeding Ratios Explained
You'll most often see a 1:1:1 ratio (starter:flour:water) in many sourdough and sourdough discard recipes. This means you'll use equal parts by weight of starter, flour, and water. So for example you could use 50 grams of each and you'd have 150 grams of bubbly starter to work with.
The higher the second two numbers are in the equation, the stiffer or less hydrated your starter will be.
The lower the second two numbers are, the looser, more runny, and more hydrated your starter will be.
If you want your starter to rise and peak faster or if you are working in a cooler environment, use a more hydrated starter ratio to speed things up. Keep in mind you will need to feed your starter more frequently with this type of ratio.
If you want a slower rise and longer peak or if you are working in a warmer environment, you can use a stiffer starter ratio to avoid your starter over fermenting and falling before you're ready to use it. Another benefit of this ratio is that you can go much longer between feedings.
This feeding ratios post from Brod and Taylor does an excellent job explaining sourdough starter feeding ratios and provides some visual guides.
Sourdough Starter FAQs and Troubleshooting
Here is a collection of my most frequently asked sourdough starter questions. I've collected many of these from my How to Make a Sourdough Starter blog post as well as from my free weekly substack newsletter, WTK Weekly. As I said above, this will be a very fluid blog post and I plan to update it often with new questions or issues that arise so please leave your questions or your tips in the comments or over on my substack and I will answer them and add them here!
Do I have to discard before feeding my starter?
I get this question so often. In order to maintain the right balance of bacteria and acidity in your starter, yes you should always discard at least half before feeding. If you continuously feed your starter and never discard any of it you will, 1.) very quickly end up with an astronomical amount of starter and 2.) your starter will become overly acidic which will result in poor oven spring and flat, gummy loaves.
What do I do with the discard?
Bake with it! Discard is a bit of a misnomer in my opinion because I never truly discard mine. I put it to use in one of my Sourdough Discard Recipes so nothing ever goes to waste. You'll always want to store your discard in the refrigerator. Let it come to room temperature if the recipe requires.
What should a sourdough starter smell like?
A well-maintained, thriving starter should smell pleasantly tangy and yeasty like yogurt or bread dough and even a little sweet when it is at peak. It will begin to smell more sour and acidic as it falls and gets closer to needing a feeding (I get a little sour when I'm hungry too - hehe).
What should a sourdough starter NOT smell like?
If your starter smells really bad or putrid like rotten meat, garbage, or spoiled food and causes you to have a very strong reaction when you smell it, it is time to toss it and start fresh. If it simply smells very, very acidic and/or like acetone, it means it is extremely hungry and needs a good discard and feeding.
My starter is over two weeks old but it doesn't pass the float test.
I used to recommend the float test but I have since learned that it is not an accurate or reliable measure of starter activity.
Instead, you will want to watch for these signs:
- Doubling after feeding.
- A slightly domed top as it is rising that will flatten out at peak.
- A pleasant aroma as we discussed above.
- Lots of bubbles and webbing when you stir it at peak.
My starter is not doubling after feedings.
If your starter is not doubling it usually means you are not discarding enough before feeding. When you try to feed a large amount of starter you will end up with a sluggish, acidic starter (and your sourdough bakes will suffer). You need to discard almost all of it, leaving only about a tablespoon in the jar. Give this tablespoon a heavy feeding of water and strong, high protein bread flour. You'll want it to be quite a thick paste. Leave this in a warm spot for 8-12 hours and watch for doubling.
Another possible reason it is not doubling could be that you have left it in the refrigerator for a very long time. In this case you'll need to give it a few feedings to bring it back to full activity. See What if you leave your starter in the refrigerator for a long time? heading above.
How to jumpstart a sluggish starter
The best way I have found to give a sluggish starter a boost is to feed it a little bit of whole wheat flour and more specifically, rye flour. Sourdough starters love rye flour and they will become active and bubbly very quickly when they are fed rye flour. If your starter is acting sluggish, take your usual flour ratio and divide it so that you are feeding half your usual flour and half whole wheat rye flour. Place in a warm spot and wait for doubling.
How to strengthen a sourdough starter (Peak-to-Peak feedings)
This might be the most important question of all as it will lead to the best loaves. A strong starter is the key to strong, stretchy dough that will open up and spring into beautiful, tall loaves once baked. The best way I have found to strengthen a sourdough starter is by doing peak-to-peak feedings. This means you will wait until your starter is at peak, take some of that peaked starter and immediately feed it again. Do this consistently and not only will your starter become strong, consistent, and predictable, but so will your sourdough loaves. My sourdough baking completely transformed when I implemented peak-to-peak starter feedings.
How soon after feeding sourdough starter can I use it?
This depends on several factors including the strength and activity level of your starter, the temperature of the rising environment, and perhaps most importantly the feeding ratio you are using (see feeding ratios explained heading above).
In an average 75 degree Fahrenheit kitchen, a 1:1:1 ratio starter will usually peak in 4-6 hours after feeding while lower hydration (stiffer) starters will take more like 8-10 hours or even more in some cases to peak.
How to feed sourdough starter without a scale
Using a scale when you're first getting started can be really helpful, but if you are totally opposed and don't want to make the investment, you can eyeball it. In my How to Make a Sourdough Starter Guide I use 60 grams each of starter, flour, and water. This roughly equates to ½ cup starter, ½ cup flour, and ¼ cup water. This will leave you with a thick pancake batter consistency. You can scale these amounts up or down as needed or change the ratio to make a stiffer starter if you like. You'll quickly learn the consistency you like.
You only need a tiny bit of starter to inoculate a pretty large amount of flour and water, so don't worry if you only have a little bit left over. In my experience it is actually better to use a small amount of starter and larger amount of flour and water.
Print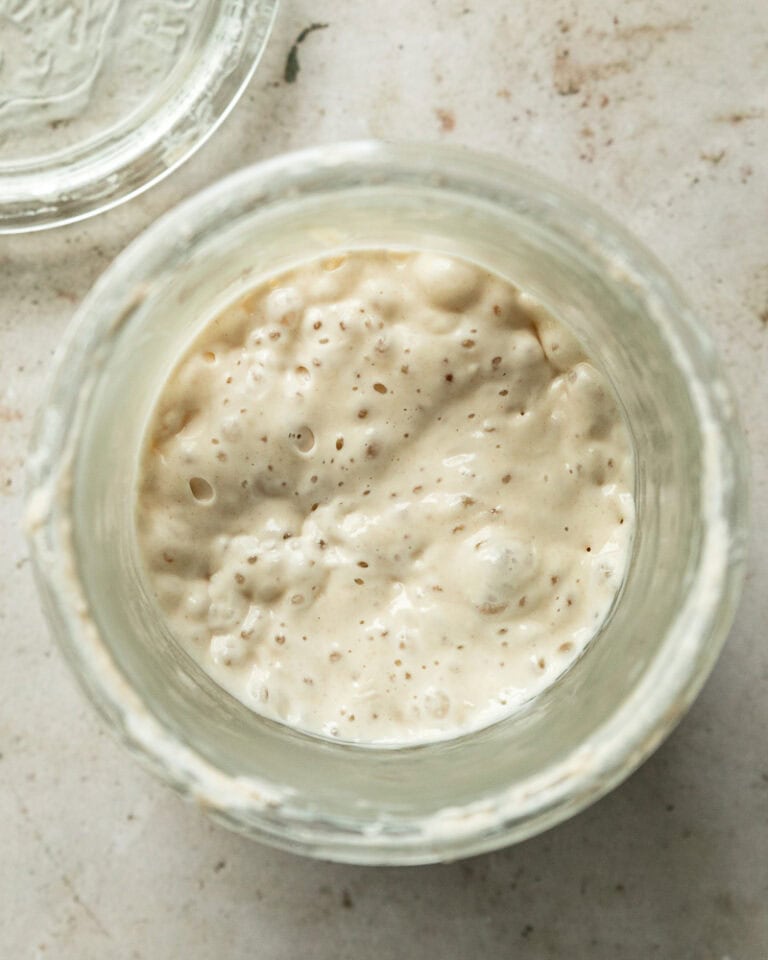
How to Feed and Maintain a Sourdough Starter (recipe)
So you've put in the time and work to establish an active, bubbly sourdough starter (or maybe you bought one or were gifted one) and you're wondering, "what now?!" In this post I will teach you what to do next to ensure a long-lasting relationship with your brand new kitchen companion. I'll not only walk you through how to feed and maintain your sourdough starter whether you are baking once a day, week, or month, but I'll also answer all of your burning sourdough starter FAQs. Think of this as your sourdough starter manual/reference guide. This post is packed with info so buckle up and enjoy!
- Total Time: varies
- Yield: one jar of active sourdough starter
Ingredients
*amounts will vary depending on your preferred ratio and the amount you'll need for baking. See blog post for details
Sourdough Starter, established and active
High Protein Bread Flour such as King Arthur
Water, filtered room temperature
Instructions
Place equal parts by weight of sourdough starter, flour, and water in a jar and mix well to combine. Cover loosely with a lid and place in a warm spot until doubled. Once starter is doubled and at peak, use it in your favorite sourdough recipes. Feed the remaining starter while it is still in its peaked state to maintain starter strength.
Notes
See blog post for loads of starter information and sourdough starter faqs. This will be a very fluid blog post and I plan to update it often with new questions or issues that arise so please leave your questions or your tips in the comments or over on my substack and I will answer them and add them here!
- Prep Time: varies
- Cook Time: n/a
- Category: sourdough
- Method: sourdough
- Cuisine: American


Leave a Rating and Review!