
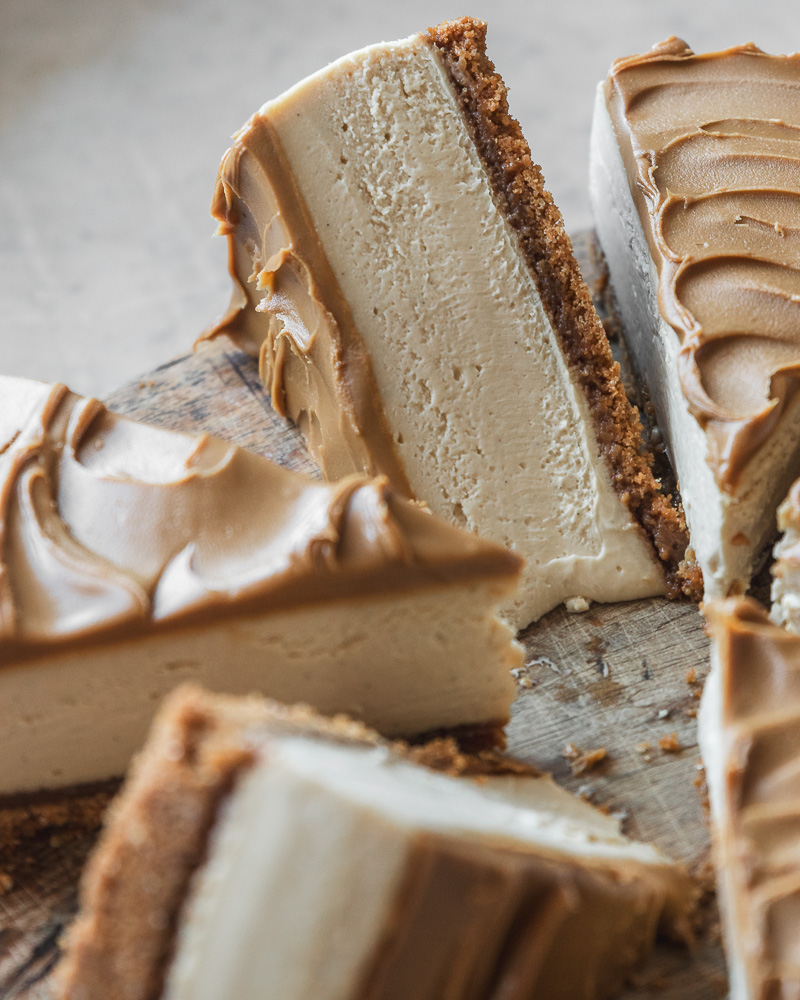
This Biscoff Cheesecake features a Lotus Biscoff cookie crust, a Biscoff cookie butter cream cheese filling all topped off with more cookie butter and crumbled Biscoff cookies. It is silky, creamy, rich-yet-light in texture. This cheesecake is for the cookie monsters in your life!

I love creating cheesecake flavors. In fact, I stumbled upon an old handwritten list of really fun flavors I had come up with years ago when I was considering starting a cheesecake business. I'll be working through that list but first up is this stunner. We have a gaggle of teenagers and they are all obsessed with Lotus Biscoff or speculoos cookies and cookie butter. Like, when I was testing this recipe I had to hide the ingredients or they'd mysteriously disappear! So this Lotus Biscoff cheesecake recipe is for the teens or the cookie butter lovers in your life.
If you love cheesecake be sure to check out my San Sebastian Cheesecake, Pumpkin Swirl Cheesecake, and keep your eyes peeled for more coming soon!
Jump to:

Ingredients for baked biscoff cheesecake
For the crust:
- Biscoff cookies: instead of traditional graham crackers we are using light, crispy biscoff cookies for the crust
- Granulated sugar: both in the crust and in the filling
- Butter: for the crust - softened and either salted or unsalted. I like the little bit of saltiness in the crust but use unsalted if you prefer.
- Kosher salt: again, a little salty contrast is nice in the crust but totally optional.
For the filling:
- Cream cheese: full fat, room temperature. I am not usually a "brands matter" kind of cook but Philadelphia cream cheese really does make the best cheesecake.
- Cookie butter: imagine the texture of peanut butter but with the toasty flavor of cookies. I can't help sneaking spoonfuls from the pantry and I totally understand why my kids are obsessed with this stuff. You can find cookie butter almost everywhere now. I used Lotus Biscoff brand but Trader Joes makes a really good one and some other store brands are popping up.
- Granulated sugar: to sweeten the filling. Not too much as the cookie butter is sweet.
- Eggs: a combination of whole eggs and yolks to get the perfect creamy texture.
- Sour cream: To lighten the cream cheese a bit and add some tanginess.
- Vanilla extract: Because I can't make a cheesecake without it.
See recipe card for quantities.
Instructions


This is a baked Biscoff cheesecake meaning the crust and the filling are baked in the oven until the filling is set. There are a lot of no-bake recipes out there but those are a very different experience and not very cheesecake-like in texture in my opinion. Also, we are baking this in a water bath - see below under Water Bath - real talk for my reasons and opinions on that subject.
How to make Lotus Biscoff Cookie Butter Cheesecake:
First make the crust:
- Preheat oven to 350 degrees F and place oven rack in lowest position.
- Take a look at your springform pan base and if the lipped edge is facing up, reverse it so that it is facing down and lock it in place. This will save you a lot of hassle trying to get the cake out of the pan later.
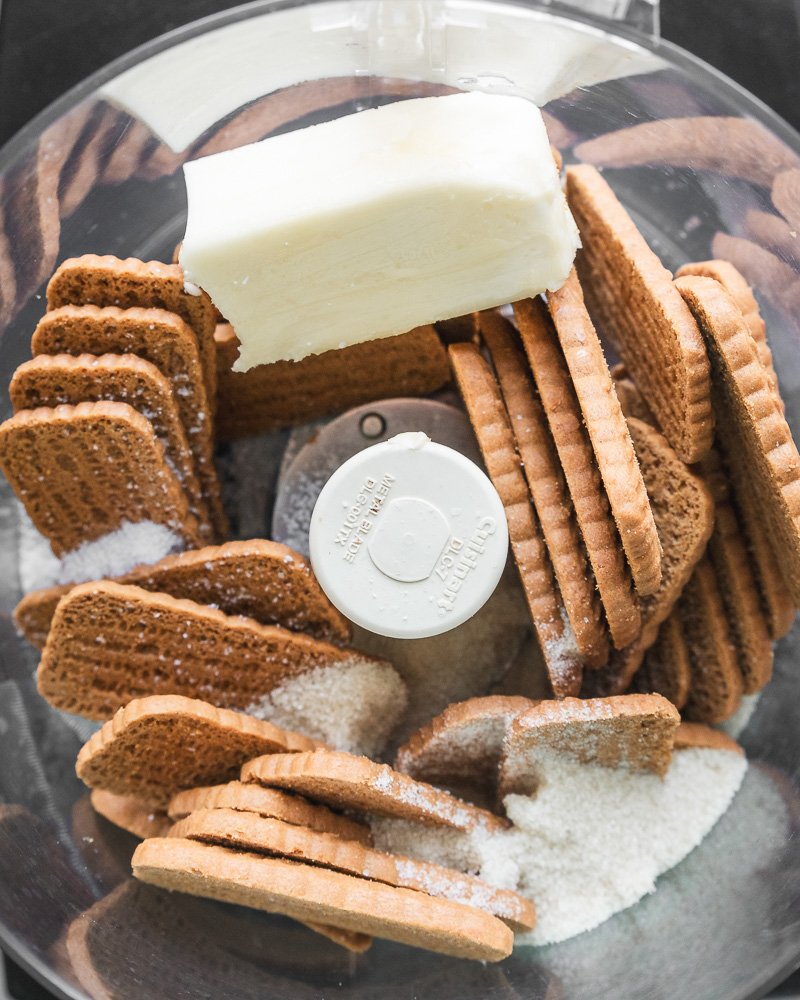
- Place crust ingredients in food processor and pulse until you have fine crumbs. Transfer crumbs to spring from pan and press into an even layer in the bottom of pan. Use a flat bottomed measuring cup to help press them down and make an even edge.
- Bake crust for 10 minutes at 350 and allow to cool while you prepare the filling.
- Adjust oven temperature to 400 degrees F and make sure oven rack is in the lowest position.
For the filling:
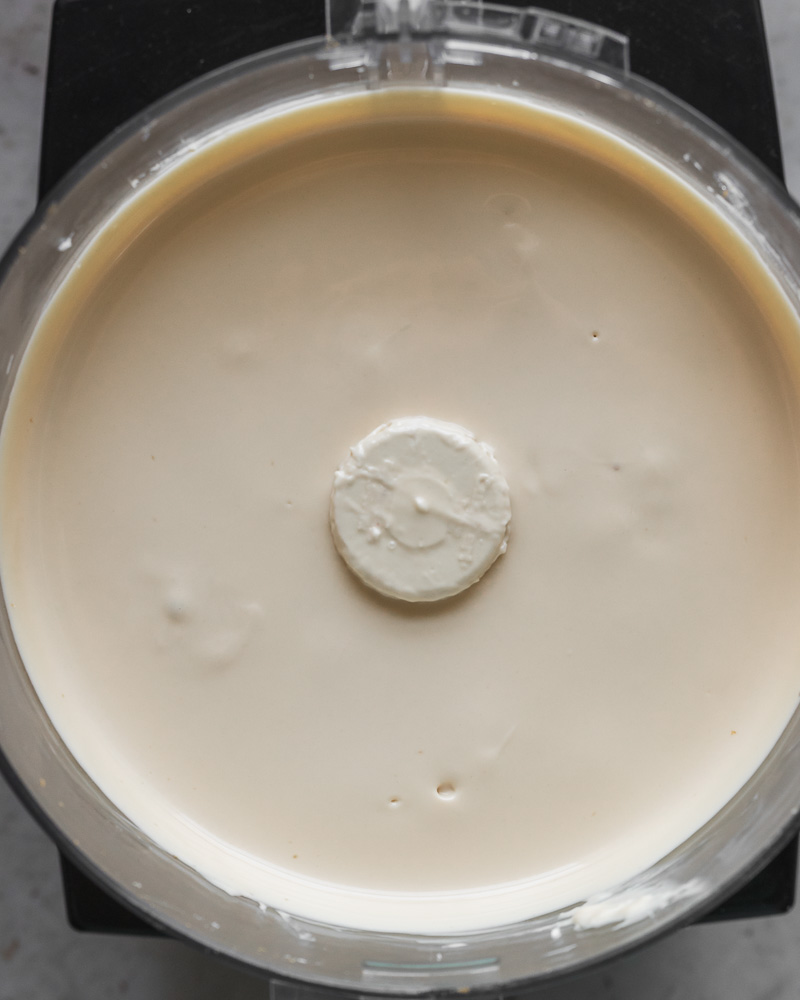
- Rinse and wipe out the food processor and add cream cheese, sugar, cookie butter. Blend until very smooth, scraping down sides and bottom once.
- Add eggs, vanilla, and sour cream and blend once more just until combined. Scrape sides and bottom and blend once more.
- Leave filling while you prepare the pan.
Prepare the pan and bake the cheesecake:
- Place 2 sheets of wide, heavy duty aluminum foil on the counter. Place one large piece of parchment on top of the foil. Place springform pan in the center of the parchment and wrap the pan in all three layers.
- Place a kitchen towel or paper towels in the bottom of a large roasting pan and place wrapped springform pan on top. Pour filling into pan. Place pan in oven with rack pulled out. Add enough hot water to come up halfway around the side of the cheesecake pan.
- Push rack in very gently and bake at 400 for 20 minutes. Reduce oven to 300 and bake for 30-40 more minutes until set but still a little wiggly when you gently shake the pan.
- Remove from oven, remove cheesecake from water bath and allow to cool to room temp for about 2 hours before placing in the refrigerator overnight until completely cooled and set.
- Release side latch and lift pan up and over the cheesecake. To remove the cheesecake from the base, run a very thin, long offset spatula under the cake and rotate so the entire base is loose. Carefully slide the cake onto a cutting board or serving platter.
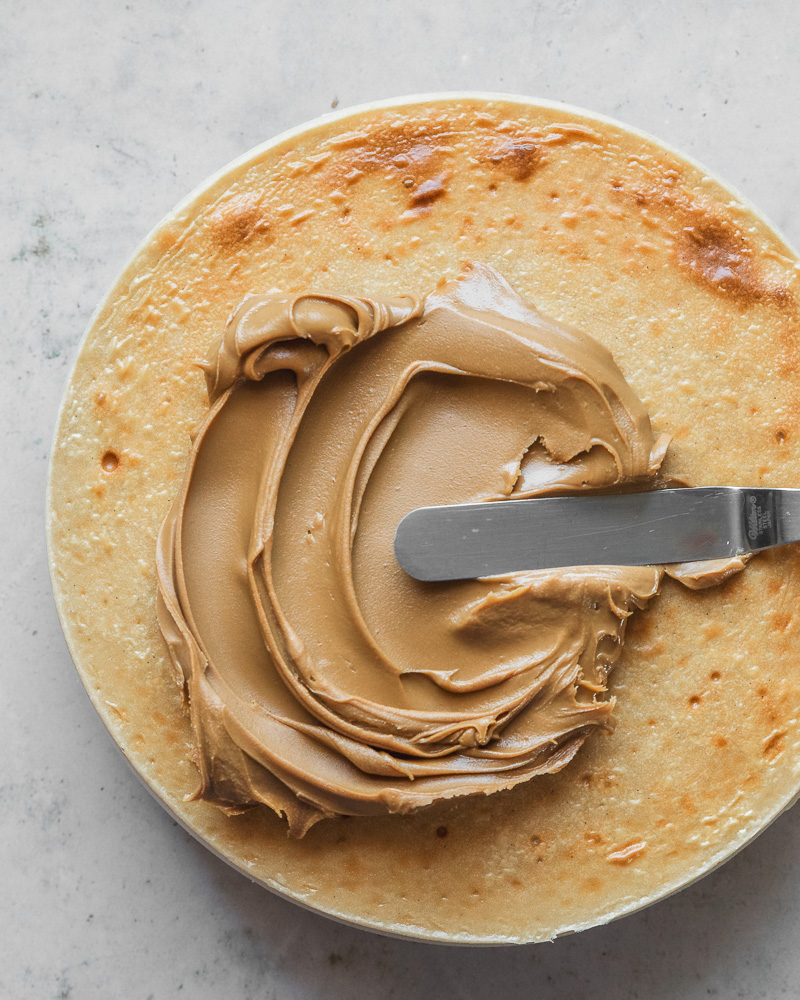
- Top with cookie butter and crumbled cookies if desired before slicing and serving.
- To make very clean slices, Press down and pull the knife out towards you, do not lift it up and out of the top of the cheesecake. Wipe the knife in between each slice.
Equipment
I always use and recommend a springform pan for my cheesecakes. There is really no better way to get a nice tall, smooth sided cheesecake. And also I can't imagine trying to wrestle a cheesecake out of a regular cake pan. 9-inch is my preferred size and what my dad always used. This is the one I use.
A food processor does the best job with this filling but you can use a hand mixer or a stand mixer too. Just blend the cream cheese, sugar, and cookie butter really, really well and scrape down the sides more than you think you should between each egg addition.
You will also need a very large roasting pan for the water bath. I use this All Clad pan I've had forever. But any large pan will do as long as the cheesecake pan is surrounded by water and it is deep enough to come up about halfway. And that brings me to my next point:
Water Bath - real talk
Do I have to bake my biscoff cheesecake in a water bath?
Yes, you do if you want the creamiest and best texture. If you see cheesecake recipes that tell you to put a pan of water in next to the cheesecake or on the rack underneath the cheesecake as a replacement for a water bath they are lying to you. This may create a bit of steam, but the whole point of a water bath is that water cannot get hotter than 212 degrees F (at least not without fancy lab equipment).
Cheesecake batter is a custard and custards do not like high, dry heat. So placing your cheesecake in a water bath allows the water to protect the custard from the higher temperature of the oven and allows it to cook gently resulting in a super creamy texture. Placing it next to a pan of water will not do this and will basically have zero effect on the cheesecake texture. It is a gimmick and you shouldn't fall for it.
Can I bake this cheesecake without a water bath?
No. If you want to bake a cheesecake without a water bath you will need to find a recipe with a lot less eggs than this one and just know that the top will sink in upon cooling and you may get cracks. It will be more dense and have a drier texture and will not be as creamy as a cheesecake baked in a water bath.

Storage
This cheesecake will keep for up to 5 days covered in the refrigerator. I do not recommend freezing this or any cheesecakes as the texture really suffers upon thawing.
Top Tip
I had this revelation several years ago and it will change your cheesecake game: Before you begin, take a look at your springform pan base and if the lipped edge is facing up as it often is, reverse it so that it is facing down and lock it in place. This will save you a lot of hassle trying to get the cake out of the pan later. The best way to remove it from the pan is to slide a long, offset spatula underneath the crust, rotating it all the way around, and slide the cheesecake off onto a board or platter.
FAQ
Biscoff cheesecake features a biscoff cookie crust and a filling that contains biscoff cookie butter. It is topped off with cookie butter and crumbled biscoff cookies.
Biscoff cookies are buttery and light in texture and the flavor is of caramelized sugar with a hint of cinnamon.
Cookie butter is made of speculoos or lotus biscoff cookie crumbs and other ingredients that are blended until it is a spreadable consistency like peanut butter.

Related
If you love this biscoff cheesecake check out my other dessert recipes:
- Sourdough Peach Cobbler
- Sourdough Discard Blondies
- Sourdough Discard Peanut Butter Cookies
- Tangzhong Sourdough Hot Cross Buns


Baked Biscoff Cookie Butter Cheesecake Recipe
This Biscoff Cheesecake features a Lotus Biscoff cookie crust, a Biscoff cookie butter cream cheese filling all topped off with more cookie butter and crumbled Biscoff cookies. It is silky, creamy, rich-yet-light in texture. This cheesecake is for the cookie monsters in your life!
- Total Time: 80 minutes plus chilling
- Yield: 1 9-inch cheesecake (8 large slices)
Ingredients
For the Lotus Biscoff Cookie Crust:
- 1 8.8 ounce package Lotus Biscoff Cookies
- ¼ cup granulated sugar
- 4 tablespoons butter, soft room temperature
- pinch of kosher salt
For the Cookie Butter Cheesecake Filling:
- 32 ounces cream cheese, room temperature (4 standard blocks)
- ½ cup granulated sugar
- ¾ cup biscoff cookie butter spread
- 4 eggs plus 2 egg yolks
- ½ cup sour cream
- 1 teaspoon vanilla extract
For topping:
- about 1 cup cookie butter (use what you should have left in the jar after making the filling)
- 8 Lotus Biscoff Cookies
Instructions
First make the crust:
- Preheat oven to 350 degrees F and place oven rack in lowest position.
- Take a look at your springform pan base and if the lipped edge is facing up, reverse it so that it is facing down and lock it in place. This will save you a lot of hassle trying to get the cake out of the pan later.
- Place crust ingredients in food processor and pulse until you have fine crumbs. Transfer crumbs to spring from pan and press into an even layer in the bottom of pan. Use a flat bottomed measuring cup to help press them down and make an even edge.
- Bake crust for 10 minutes at 350 and allow to cool while you prepare the filling.
- Adjust oven temperature to 400 degrees F and make sure oven rack is in the lowest position.
For the filling:
- Rinse and wipe out the food processor and add cream cheese, sugar, cookie butter. Blend until very smooth, scraping down sides and bottom once.
- Add eggs, vanilla, and sour cream and blend once more just until combined. Scrape sides and bottom and blend once more.
- Leave filling while you prepare the pan.
Prepare the pan and bake the cheesecake:
- Place 2 sheets of wide, heavy duty aluminum foil on the counter. Place one large piece of parchment on top of the foil. Place springform pan in the center of the parchment and wrap the pan in all three layers.
- Place a kitchen towel or paper towels in the bottom of a large roasting pan and place wrapped springform pan on top.
- Rub a tiny bit of butter around the sides of the pan to ensure no sticking. The pan should still be warm so this is very easy to do.
- Pour filling into pan. Place pan in oven with rack pulled out. Add enough hot water to come up halfway around the side of the cheesecake pan.
- Push rack in very gently and bake at 400 for 20 minutes. Reduce oven to 300 and bake for 30-40 more minutes until set but still a little wiggly when you gently shake the pan.
- Remove from oven, remove cheesecake from water bath and allow to cool to room temp for about 2 hours before placing in the refrigerator overnight until completely cooled and set.
- Release side latch and lift pan up and over the cheesecake. To remove the cheesecake from the base, run a very thin, long offset spatula under the cake and rotate so the entire base is loose. Carefully slide the cake onto a cutting board or serving platter.
- Top with cookie butter and crumbled cookies if desired before slicing and serving.
- To make very clean slices, Press down and pull the knife out towards you, do not lift it up and out of the top of the cheesecake. Wipe the knife in between each slice.
- Top with cookie butter and crumbled cookies if desired before slicing and serving.
- To make very clean slices, Press down and pull the knife out towards you, do not lift it up and out of the top of the cheesecake. Wipe the knife in between each slice.
- Prep Time: 20 minutes
- Cook Time: 1 hour
- Category: dessert, cheesecake
- Method: baking
- Cuisine: American
Olivia Tworkowsky says
can we make this into minis, what would you recommend?
anita | wild thistle kitchen says
Hi there - I think that would work. If you are using a standard muffin pan I'd start checking them after 15-20 minutes. Let me know if you give it a try!
Léa says
Hi there, I am planning on making this tomorrow. Quick question - does the recipes really call for
4 32-ounce blocks cream cheese? This seems like a lot. Thanks!
anita | wild thistle kitchen says
Hi there! no it is 4 8-ounce blocks for a total of 32 ounces. Let me know if you have any other questions 🙂