I declare these layered pumpkin chocolate scones the official scones of Halloween! The orange and black combo is perfect and all natural thanks to pumpkin puree and black cocoa powder. Keep reading for lots of step-by-step photos and all my usual scone tips.

'Tis the season for all the pumpkin recipes and Halloween will be here before we know it. That was the inspiration behind this recipe; I just wanted to create something fun for Halloween - something that is rather lacking on my blog I must admit. And since scone recipes are one of my favorite things to create it was an easy choice. I thought about just adding chocolate chips or chunks to my Spiced Pumpkin Scones recipe but then decided to get carried away and create a whole new recipe!

How to make layered pumpkin chocolate scones
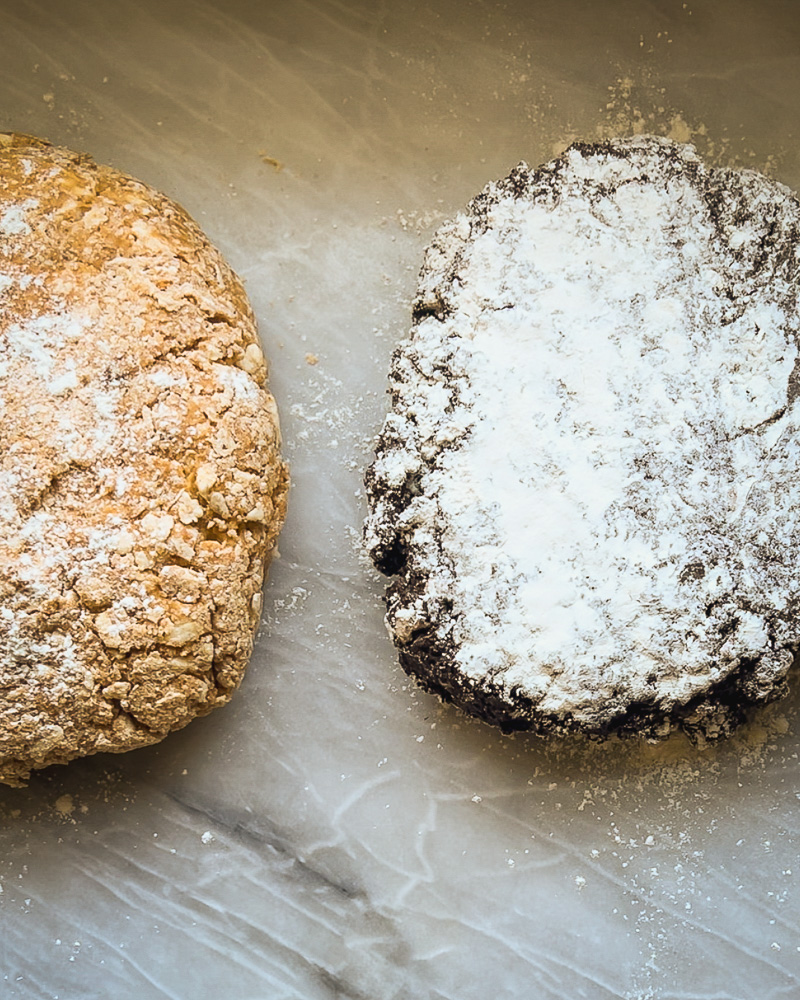
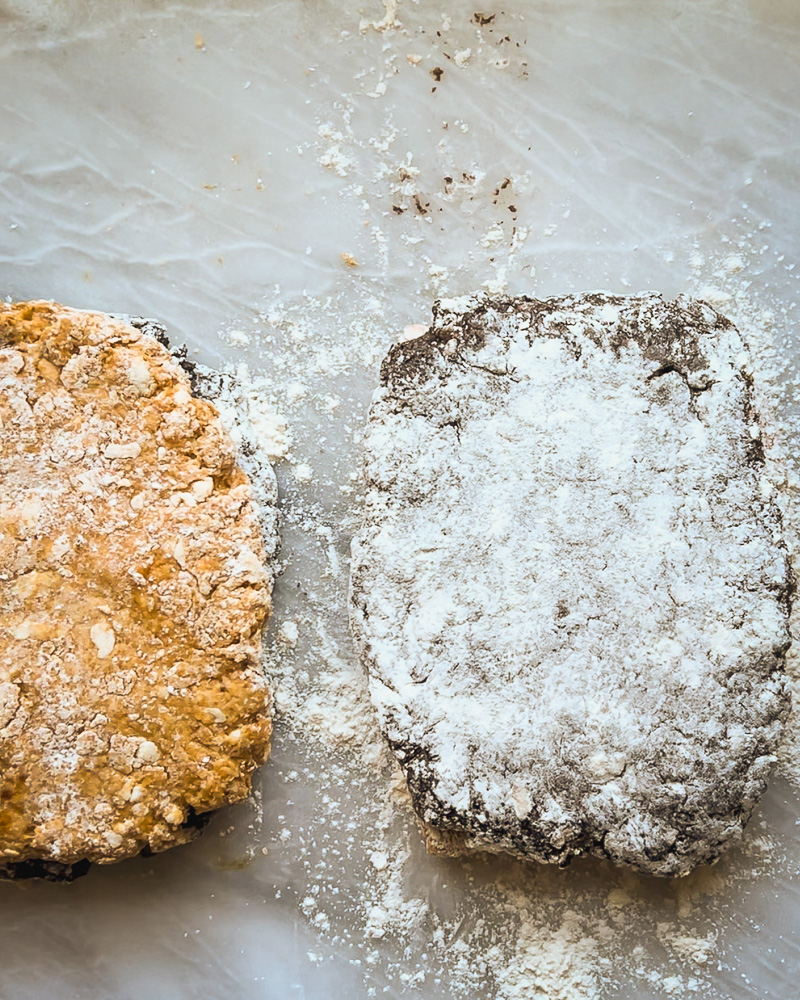
Don't be fooled by the layers, these scones are not complicated. They start out with the same dry mixture and the same wet mixture. Once the dry mix is made and the butter is incorporated I draw a line down the middle with my finger and separate out half of the dry mix to another bowl. I then add black cocoa powder to one of the bowls. Then the wet mixture gets divided between the two bowls. This creates a chocolate dough and a pumpkin dough. Once the two doughs are made, I stack one on top of the other and perform my signature cutting and stacking technique to create all of those fun layers. That's the gist of it! I am thrilled with the results! Check out the photos, recipe card, and notes for more detailed instructions.
Ingredients for these layered pumpkin chocolate scones:
- all purpose flour - I use King Arthur or Azure Standard
- baking powder - for some lift - I use aluminum free
- kosher salt - always diamond kosher
- pumpkin pie spice - any brand you like, or you can just use cinnamon
- light brown sugar - dark would work as well
- butter - salted or unsalted, very cold, grated
- heavy cream - I've used half and half in many of my scones and it works just fine
- canned pumpkin puree (not pumpkin pie filling) - for color, flavor, and serious moisture in these scones
- molasses - just to boost the Fall vibes and it also enhances the orange color a bit. I use Grandma's brand.
- egg - for moisture and sturdiness
- vanilla extract - for that sweet elegance
- black cocoa powder - I use this one from King Arthur. If you want to make these with regular cocoa powder they will be great, just not as dramatically dark.
- egg wash and granulated sugar for topping - I decided not to glaze these because I love the way the crackled tops look and how you can actually see the 2nd layer peeking through the cracks on top. But without the egg wash they did look very dry on top so I decided to add an egg wash and a sprinkle of granulated sugar. If you were really making these for Halloween, some colored sugar or even Halloween sprinkles would be very fun!
Step-by-step photos
I am a very visual learner so I always try to add step-by-step process photos especially with a recipe that has multiple steps like this one. I hope you find them helpful.


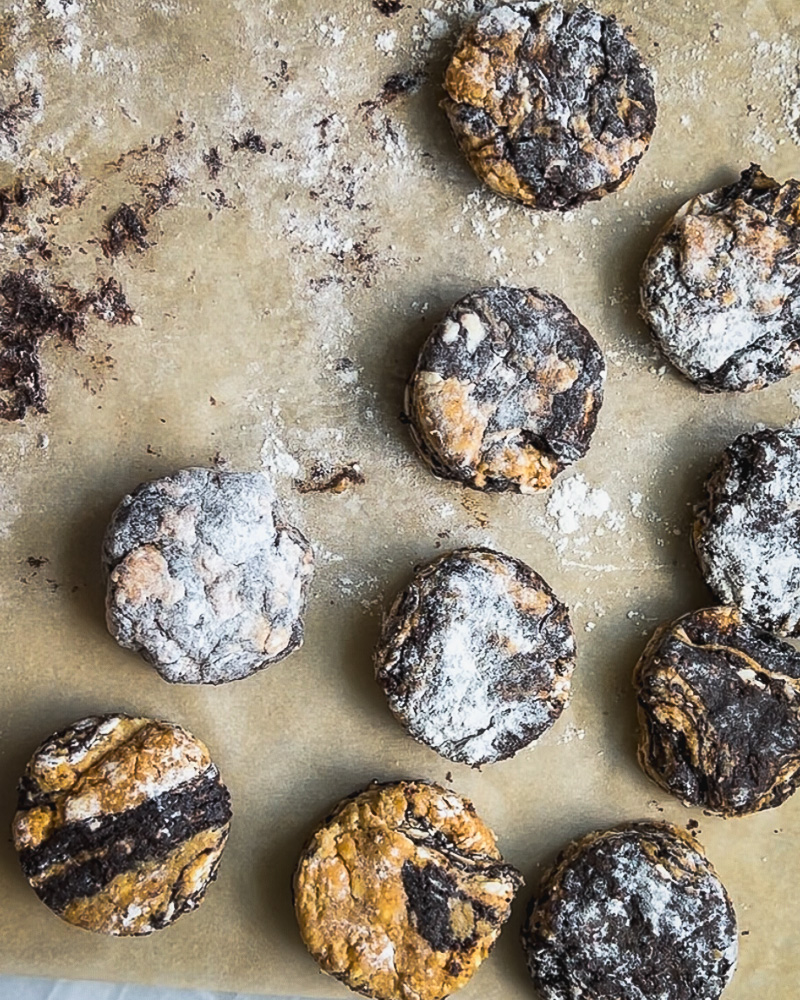
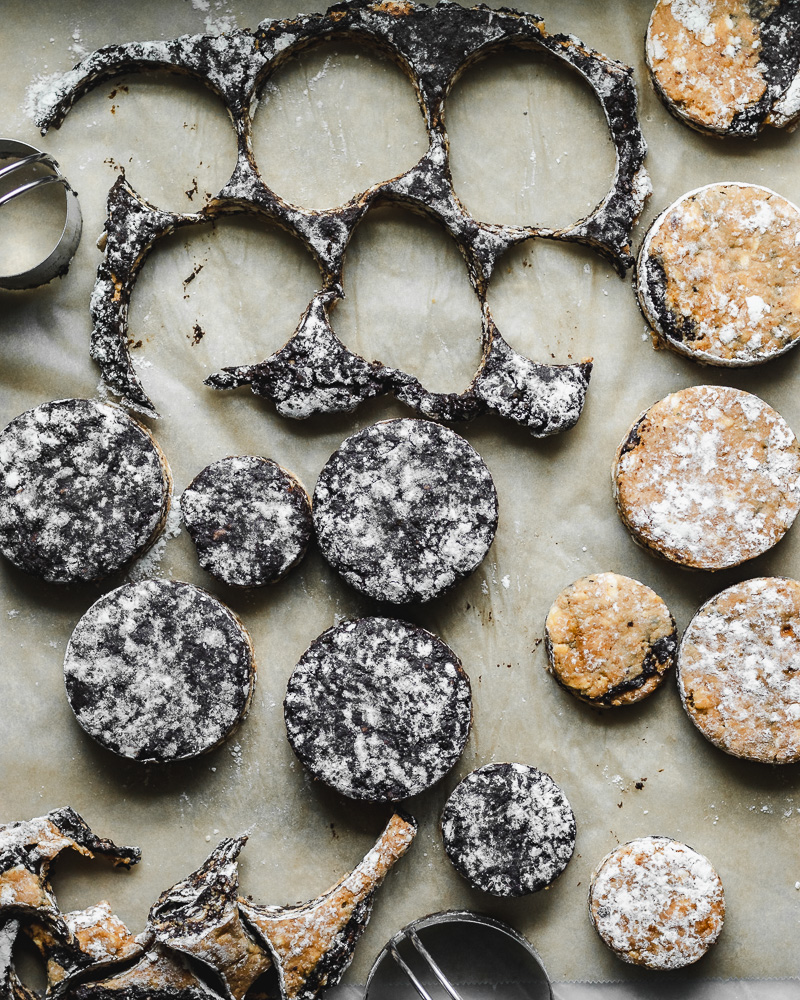
the scrap scones will be extra wild and more marbled than layered, but I think they are really fun! With all of them, just make sure to freeze them for at least 30 minutes before baking. This is especially important with a dough like this since we are fussing with it so much. You want to make sure the butter is super chilled before they go in the oven.

What is the secret to making good scones
I share these same tips for ALL of my scone recipes:
- Start with cold ingredients - cold butter, cold egg, cold cream - some people freeze the dry ingredients and the bowls/utensils. I think that's overkill.
- Something new I've been doing is to grate the cold butter on a box grater. It is a game changer and creates the perfect butter to flour ratio (and no need to use a pastry cutter! Woohoo!)
- Err on the side of too little liquid - it is better to have a slightly dry dough than a too-wet dough. You can incorporate the dryer bits as you are folding and stacking the dough.
- Mix gently - my weapon of choice is a fork - while slowly drizzling in wet ingredients. You aren't trying to develop any gluten in these tender babies.
- Once mixed, divide and stack dough 2-3 times to get perfect, flaky layers.
- Freeze dough for 30 minutes or more before baking (see make ahead tips below).

I hope you'll give these fun Halloween-themed Scones a try!
If you do, make sure to let me know by leaving a comment and star rating below. And if you want, tag me on instagram or facebook so I can see! You can find me here:
Instagram: @wild.thistle.kitchen
Facebook: wild thistle kitchen blog
More Pumpkin Recipes:
- Pumpkin Sage Dinner Rolls
- Pumpkin Banana Muffins - so good and so easy!
- Pumpkin Swirl Cheesecake - The creamiest! with a gingersnap crust and gingerbread caramel sauce.
- Skillet Pumpkin Crisp with Gingersnap Streusel
- Pumpkin Swirl Cheesecake Bars


Layered Pumpkin Chocolate Scones
These buttery, flaky Layered Pumpkin Chocolate Scones are the official scone of Halloween with alternating layers of pumpkin and black cocoa dough.
- Total Time: 48 minutes
- Yield: about 18 scones
Ingredients
- 3.5 cups all purpose flour
- 2.5 teaspoons baking powder
- ½ teaspoon kosher salt
- 2 teaspoons pumpkin pie spice
- ½ cup light brown sugar
- 8 ounces butter (2 standard sticks), grated on large holes of box grater
- 1 cup heavy cream
- ¾ cup canned pumpkin puree (not pumpkin pie filling)
- 2 tablespoons molasses
- 1 egg
- 1 teaspoon vanilla extract
- ¼ cup black cocoa powder
For topping
- 1 egg mixed with one tablespoon water
- a couple tablespoons granulated sugar
Instructions
TO PREPARE THE SCONES:
- In a 2 cup or larger glass measuring cup, combine wet ingredients - cream, pumpkin, molasses, egg, and vanilla. Whisk to combine thoroughly and set aside.
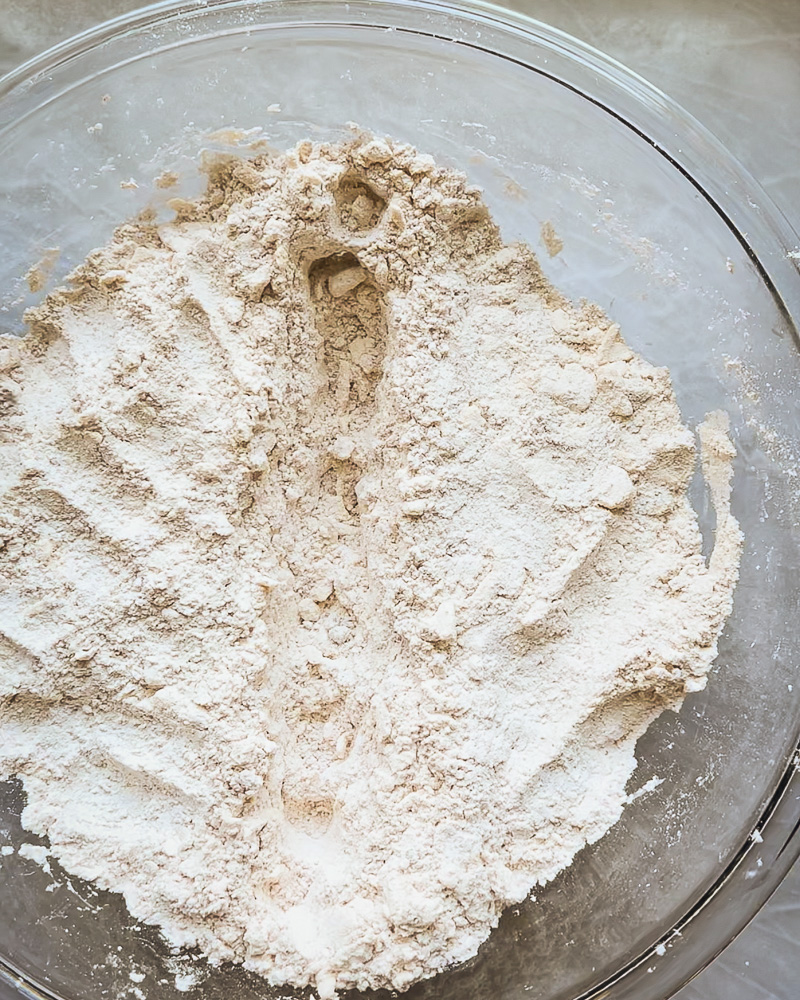
- In a large mixing bowl, combine flour, baking powder, salt, pumpkin pie spice, and sugar. Mix well, make sure to break up any brown sugar clumps if you find any. Add grated butter and mix so that all butter pieces are coated in flour.
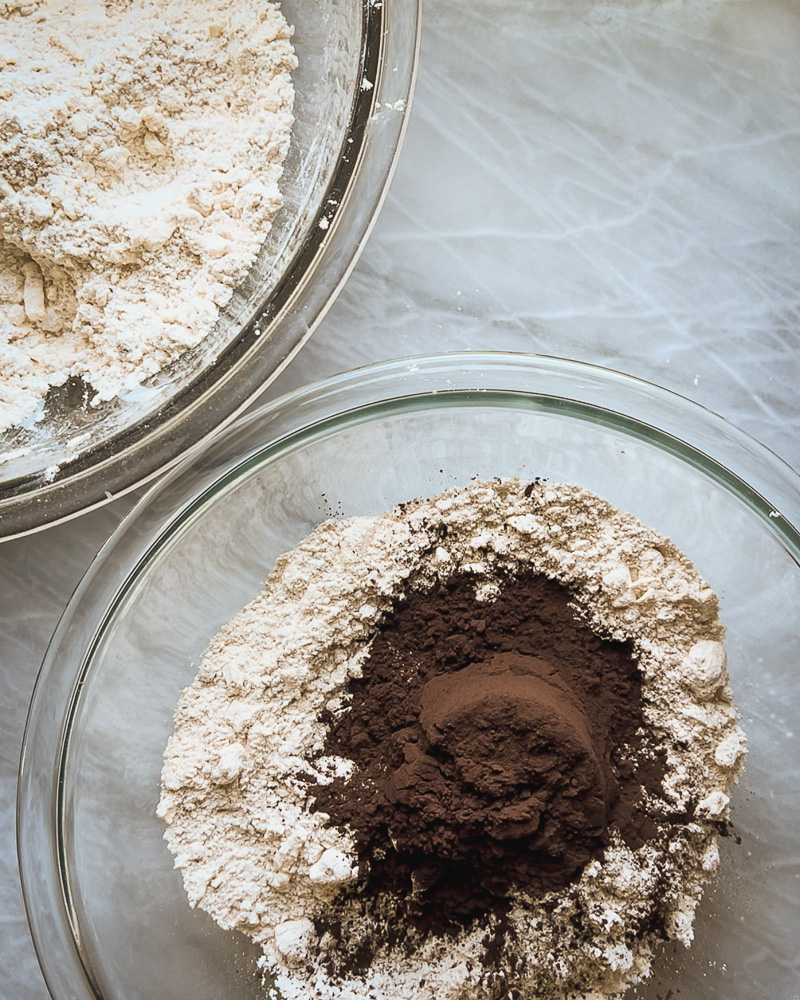
- Press the mixture into an even thickness in the bowl and draw a line down the middle with your finger. Remove half of dry mixture to another mixing bowl.
- Add ¼ cup black cocoa to one of the bowls.
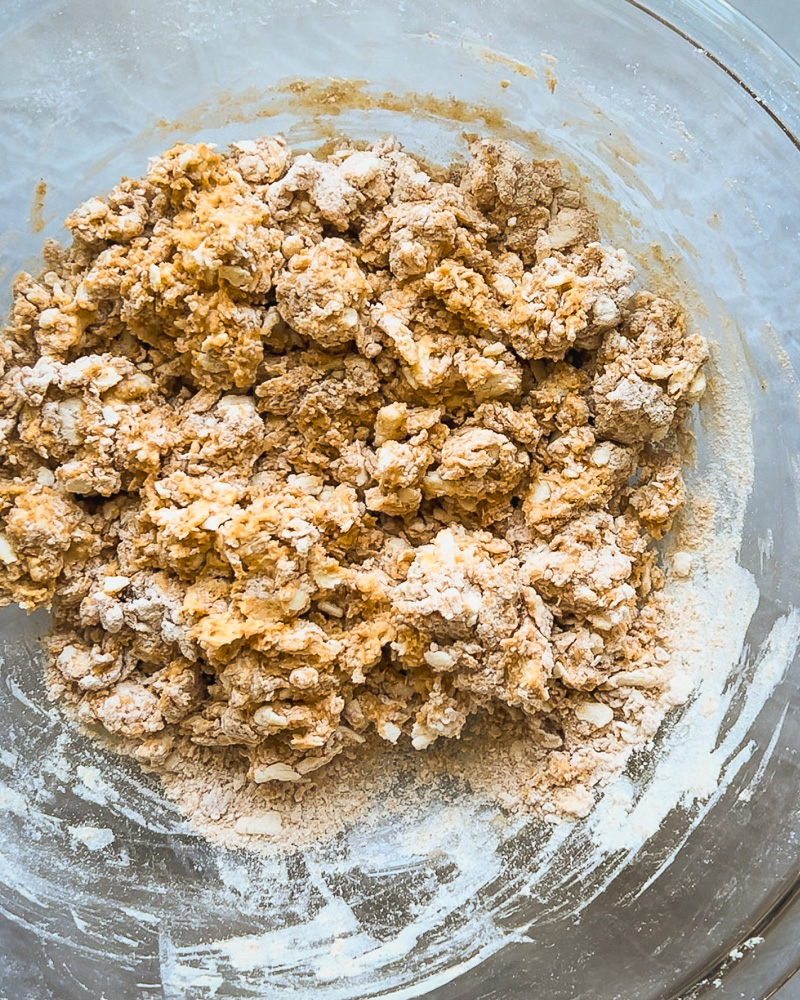
- Slowly drizzle about ½ of the wet mixture over the plain dry mixture in one bowl, tossing and stirring with a fork as you pour. Make sure to stir up from the bottom so you don't end up with a bunch of dry flour hiding. Repeat this process with the cocoa powder bowl. You are looking for a shaggy, mostly moistened dough with a few dry bits. If you feel your dough is getting too wet, stop adding the wet mixture.
- Use a flexible dough scraper or your hands to push and squeeze the dough together in the bowl. You don't want to knead it, but you do want to bring it together. Dump one dough at a time onto a lightly floured surface and squeeze and pat it together into a rectangle of about 1 inch thickness. If you do have some dry flour left, just press it into the dough now - it will get incorporated as we are layering the doughs. Alternatively, if your dough is sticky, use flour as needed to prevent too much stickiness.
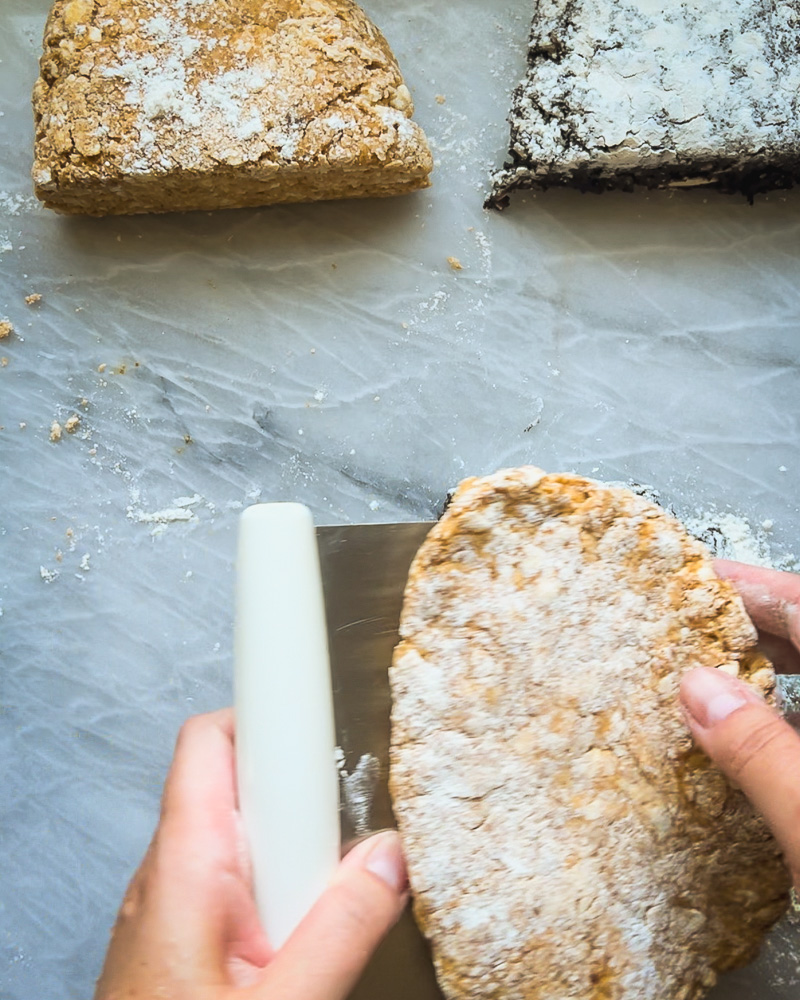
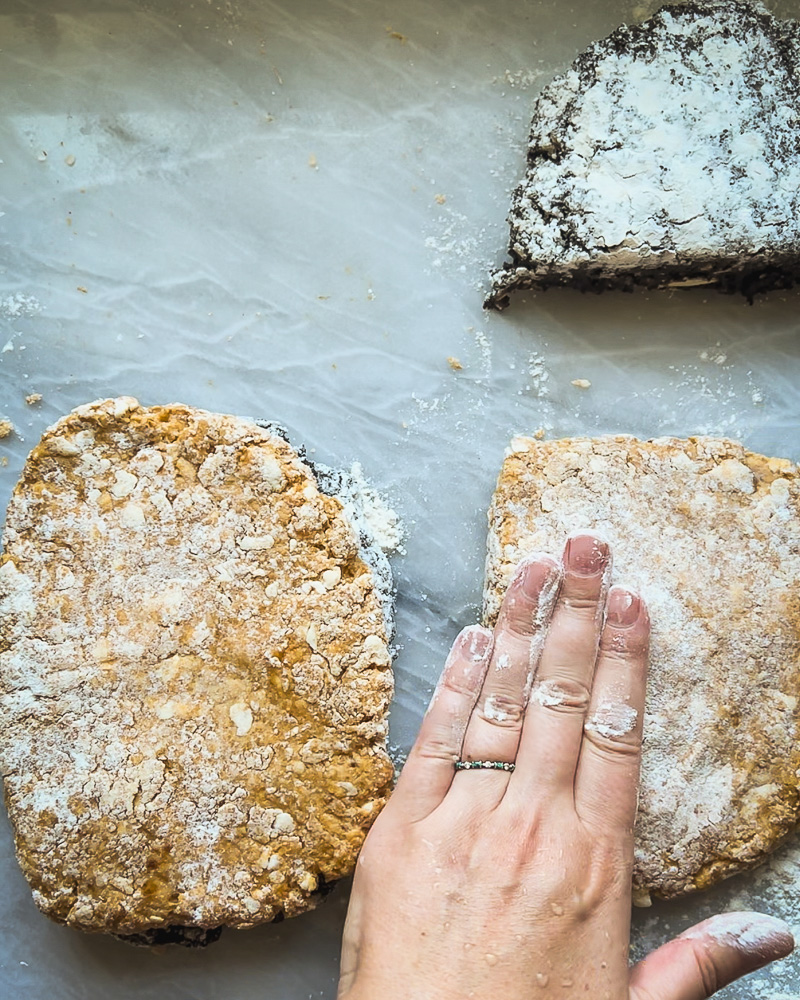
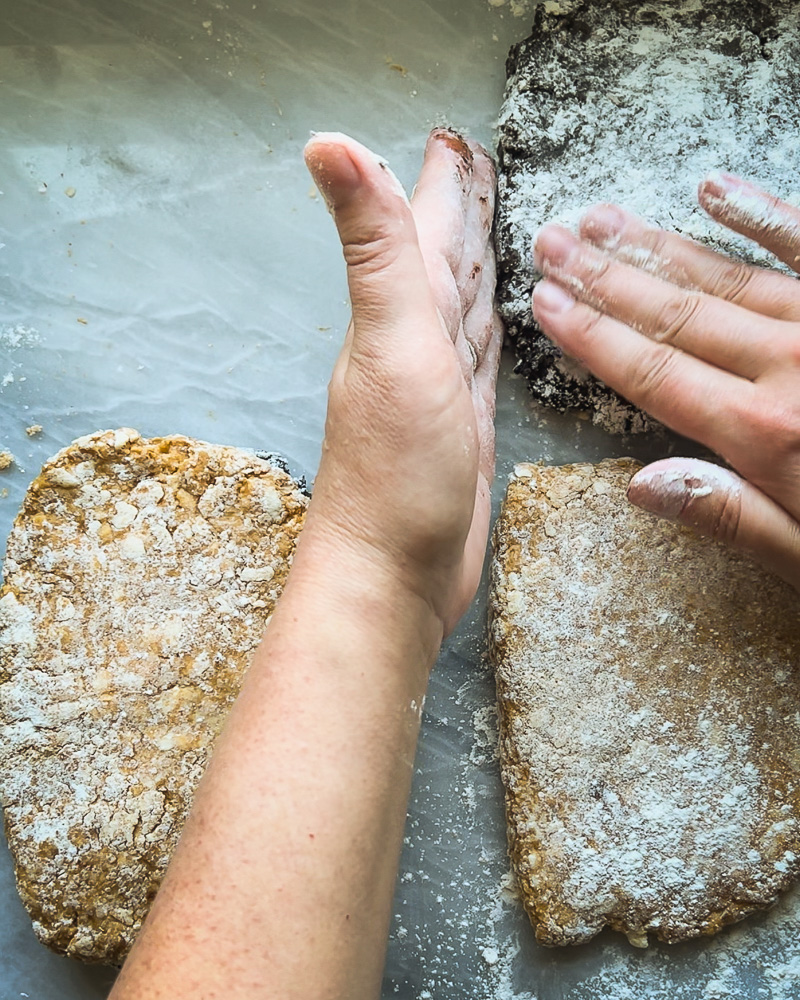
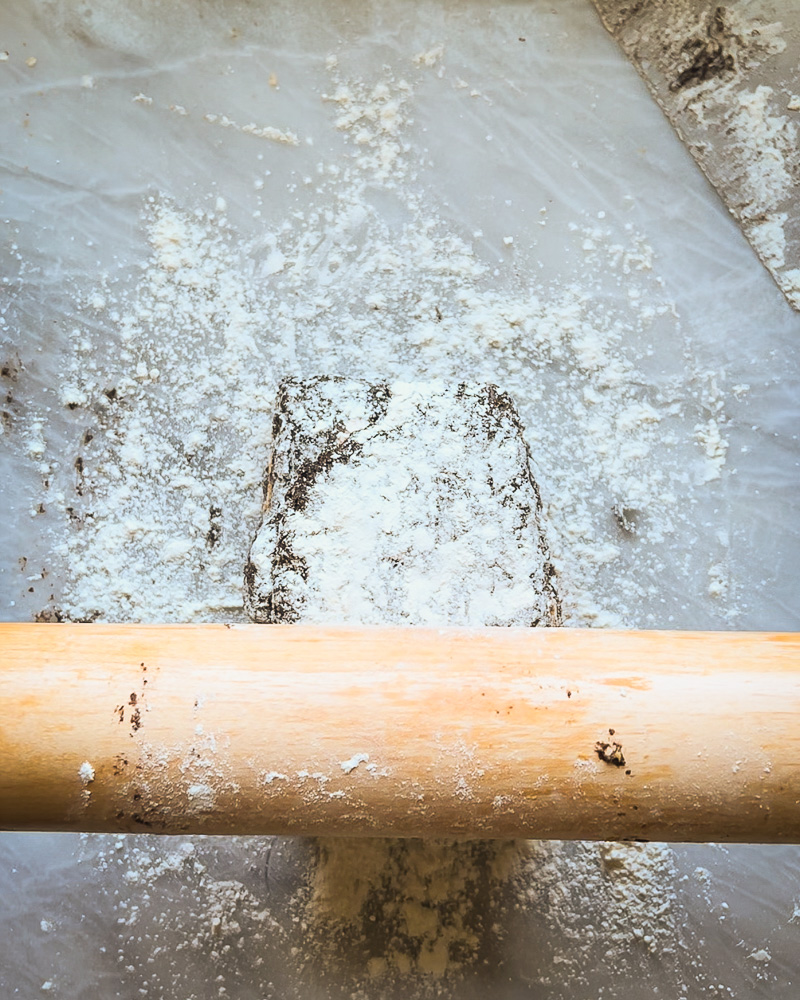
- Make sure to check out the step-by-step photos above in the blog post for this part: Once you have your two dough rectangles, one orange and one cocoa, divide each one in half so that you have 4 square-ish pieces of dough. Place one orange on top of one cocoa, and then one cocoa on top of the remaining orange. Gently pat each one down to about the original thickness. Repeat the dividing and stacking once more.
- Press or roll each portion of dough into a rectangle. The size of the rectangle doesn't matter - you are looking for a thickness of about 1.5 inches.
- Place the dough in the freezer for about 30 minutes to firm up. Preheat oven to 400 degrees F and clean up your mess while the dough freezes.
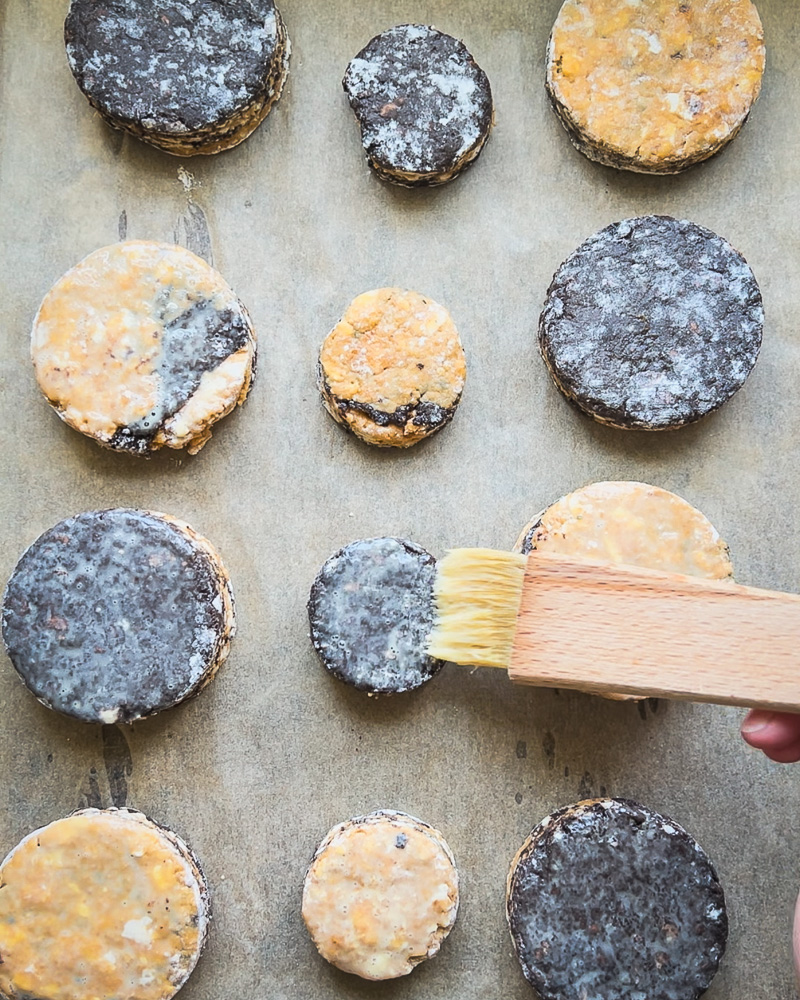
- After 30 minutes, remove from freezer and cut scones with a 3 inch biscuit cutter. Stack and press the scraps until you've used all of the dough. The scones made from scraps will be a lot more wild and marbly but still delicious and I think they're really fun. I actually like to use a smaller biscuit cutter for the scrap scones just for some variety and it just makes it easier to get all the dough used up.
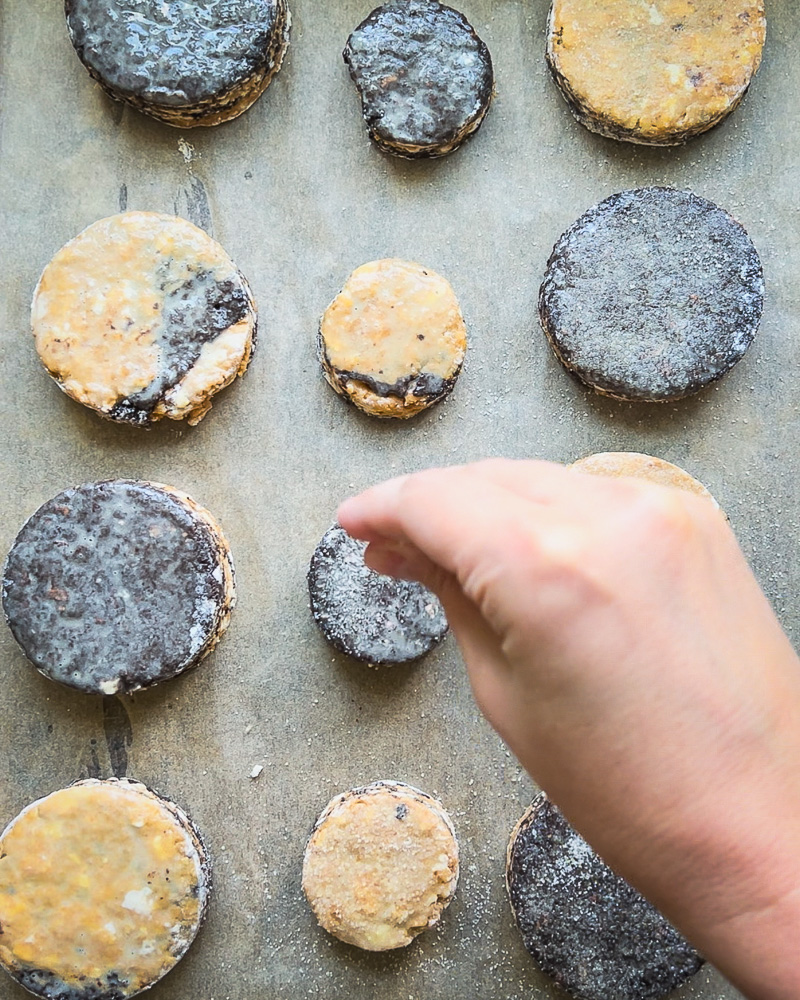
- Place scones about ½ inch apart on parchment lined baking tray, brush tops with beaten egg and sprinkle lightly with sugar.
- Bake for 18-20 minutes in preheated oven.
Notes
If you don't want to grate the butter or don't have a box grater you can cube the butter and cut it into the dry mixture with a fork, your fingers, or a pastry cutter.
I find it best to work with the plain pumpkin dough first in steps 5 and 6 so you don't get cocoa dough mixed with pumpkin dough.
- Prep Time: 30 minutes plus chilling
- Cook Time: 18 minutes
- Category: scones, breakfast, dessert, brunch
- Method: baking
- Cuisine: American
Leave a Rating and Review!