
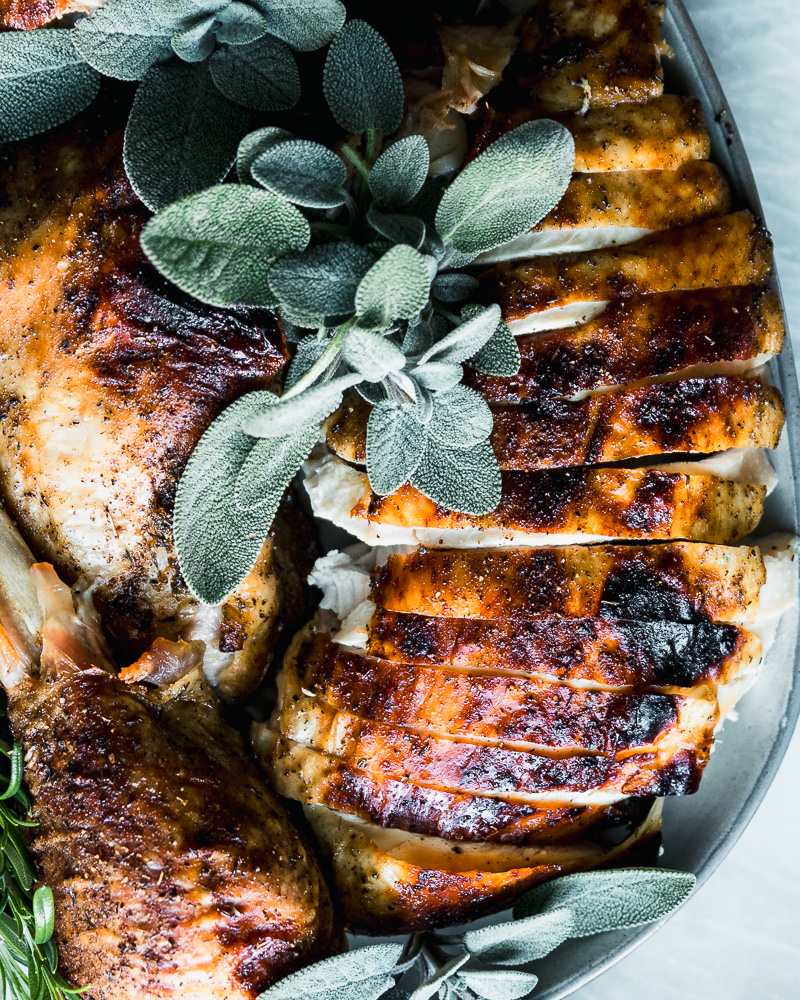
With this Dry Brined Spatchcocked Turkey recipe, you get the juiciest, most flavorful turkey in a fraction of the roasting time of traditional cooking methods. And another big bonus: It is so easy to carve!

While this recipe is delicious any time of year, it is especially perfect for Thanksgiving and Christmas.
This turkey pairs well with sourdough stuffing with sausage, red skinned mashed potatoes with sour cream, roasted honey nut or acorn squash, or any of my Thanksgiving Side Dishes.
Jump to:
Ingredients
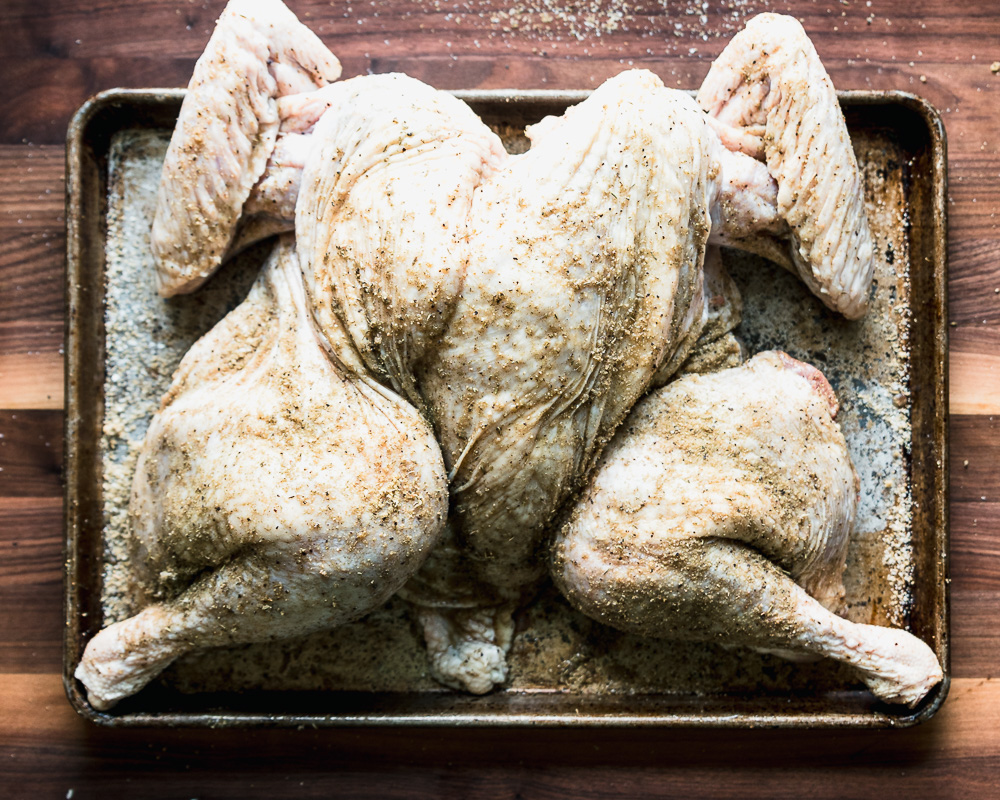
For this Dry Brined Spatchcocked Turkey recipe you will need one 10-14 pound turkey. The turkey in these images was a 14 pounder and was almost too big for my roasting pan, so keep that in mind when choosing a turkey! Other than the turkey you will just need a few seasonings and some olive oil.
- 10-14 pound turkey
- dry brine seasoning blend
- olive oil
See recipe card for exact quantities.
Instructions
Here are some up close and personal step-by-step photos of how to spatchcock a turkey.
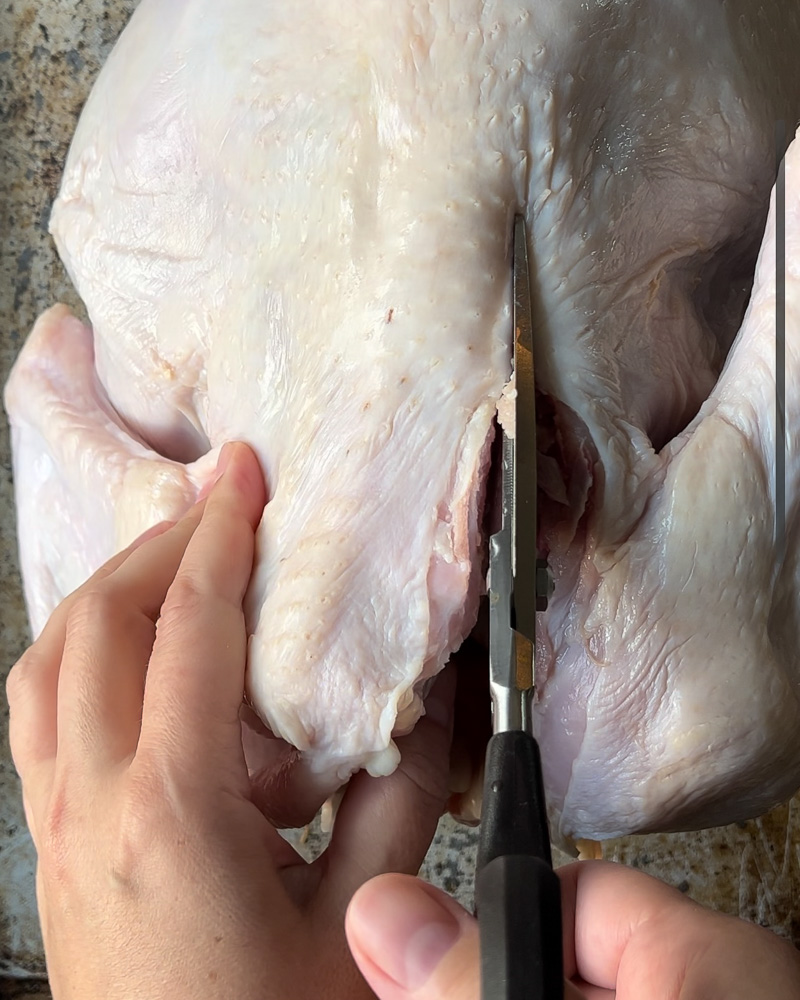
Cut down first side of backbone.

Cut down second side of backbone. Remove backbone and reserve for stock.

Press down on top of breastbone with sharp chef's knife.

Press down firmly on both sides to open up the rib cage and flatten the turkey.

season inside of turkey and flip over

season skin side and underneath skin on breast meat
- Mix all dry brine ingredients together in a small bowl and set aside.
- Place turkey breast side down on a large cutting board (you can also do this in your sink to have an easier clean up). Using poultry shears, cut down one side of the backbone at a time to remove the backbone, reserving for turkey bone broth if desired.
- Using a sharp knife, make a slit in the very top part of the breast bone where the wishbone is - press down firmly. Then with your hands, pull the ribcage apart firmly and press down to open up the turkey. Season the inside of the turkey with the dry brine.
- Flip the turkey over onto a sheet pan so the breast is facing up. Tuck wing tips under. Season all over with dry brine making sure to rub some between the skin and the breast meat for extra flavor penetration.
- Once turkey is well seasoned, place turkey on a rack on a rimmed sheet pan uncovered in refrigerator overnight for at least 12 hours or up to 24 hours.
- When ready to roast, preheat oven to 425 degrees F. Discard/rinse any juices that have accumulated on the pan overnight - do NOT rinse the turkey.
- Brush turkey skin with olive oil and roast until thigh meat registers 165 degrees on an instant read thermometer. This will take about 6 minutes per pound or about an hour for a 10 pound turkey. If turkey is browning too quickly, loosely tent with foil.
- Once turkey is roasted, allow to rest for 20-30 minutes before carving and serving. The skin will be the crispiest right out of the oven so make sure to sneak a few crispy bites when nobody is looking.
Hint: If your turkey is fresh, not frozen, you can ask the butcher to remove the backbone for you.
Variations
If you want to switch up the herbs and seasonings in the dry brine, feel free! Here are some ideas but the possibilities are nearly endless - just keep the salt and sugar quantities the same for an effective dry brine.
- rosemary
- lemon zest
- oregano, basil, fennel seed for an Italian flavor
- orange zest and chinese five spice powder
- add some spice with chili powder or red pepper flakes
- dried ginger or even a tiny bit of cinnamon for a festive flavor
Equipment
You will need a good pair of poultry shears for this as well as a large, rimmed baking sheet and a wire rack (affiliate links).
If your baking sheet is not quite large enough and the wings or legs hang over a bit, make sure to line your oven rack with foil to prevent anything from dripping in your oven and smoking up the kitchen.
Storage
Once roasted, leftovers should be stored in the refrigerator or freezer within 2 hours. If you are saving the carcass for stock, I suggest freezing it just to be safe unless you plan on making the stock same or next day.
Top tip
For the crispiest skin, leave the turkey uncovered in the refrigerator overnight. I know it's a little bit strange to have a huge, uncovered bird in your fridge, but it is so worth it for the crispy skin! Since the turkey is flattened, it really doesn't take up much vertical space, so clear a shelf with just enough clearance so you don't take up valuable holiday fridge space.

FAQ
Dry-brining eliminates the hassle of a wet brine by taking advantage of the natural moisture of the meat. When allowed to rest for 12-24 hours, the salt/sugar mixture pulls out the meat's moisture and then that seasoned moisture is absorbed back into the meat. It's delicious kitchen magic!
Absolutely! Dry brining is so much easier than wet brining and even more effective. With just a few minutes of prep time and an overnight rest in the refrigerator you will be rewarded with juicy meat and crispy skin - no more dried out meat or flabby skin!
Nope, there is no need to rinse this turkey. I have seen some recipes that use excessive amounts of salt and therefore call for rinsing, but this recipe is just the right blend of salt, sugar, and spices to ensure a flavorful turkey but without the need to rinse.
You will cook the spatchcocked turkey at 425 degrees F until the thigh reaches 165 degrees F.
A spatchcocked turkey cooks in less than half the time. A spatchcock turkey cooks in about 6 minutes per pound as opposed to about 13 minutes per pound for an intact turkey.
Related
Looking for other poultry recipes? Try these:
- Pink Peppercorn Baked Chicken Wings with Pecorino + Rosemary
- Sticky Southeast Asian Chicken Wings
- Crockpot White Chicken Chili Recipe
- Dad's Homemade Chicken and Sausage Gumbo


Pairing
Check out my side dishes for some ideas of what to serve with this dry brined spatchcocked turkey:
- Smashed Raclette Potatoes
- Make Ahead White Wine Turkey Gravy
- Sourdough Stuffing
- Red Skinned Mashed Potatoes


Dry Brined Spatchcocked Turkey
With this Dry Brined Spatchcocked Turkey recipe, you get the juiciest, most flavorful turkey in a fraction of the roasting time of traditional cooking methods. And another big bonus: It is so easy to carve!
- Total Time: varies depending on weight
- Yield: 6-8 servings
Ingredients
- 1 10-14 pound turkey
- ¼ cup diamond crystal kosher salt (if using another salt you will need to use less - see notes)
- 3 tablespoons brown sugar
- 2 tablespoons poultry seasoning blend
- 1 teaspoon ground white pepper
- 1 teaspoon ground black pepper
- olive oil
Instructions
- Mix all dry brine ingredients together in a small bowl and set aside.
- Place turkey breast side down on a large cutting board (you can also do this in your sink to have an easier clean up). Using poultry shears, cut down one side of the backbone at a time to remove the backbone, reserving for turkey bone broth if desired.
- Using a sharp knife, make a slit in the very top part of the breast bone where the wishbone is - press down firmly. Then with your hands, pull the ribcage apart firmly and press down to open up the turkey. Season the inside of the turkey with the dry brine.
- Flip the turkey over onto a sheet pan fitted with a wire rack so the breast is facing up. Tuck wing tips under. Season all over with dry brine making sure to rub some between the skin and the breast meat for extra flavor penetration.
- Once turkey is well seasoned, place turkey on a rack on a rimmed sheet pan uncovered in refrigerator overnight for at least 12 hours or up to 24 hours.
- When ready to roast, preheat oven to 425 degrees F. Discard/rinse any juices that have accumulated on the pan overnight - do NOT rinse the turkey.
- Brush turkey skin with olive oil and roast until thigh meat registers 165 degrees on an instant read thermometer. This will take about 6 minutes per pound or about an hour for a 10 pound turkey. If turkey is browning too quickly, loosely tent with foil.
- Once turkey is roasted, allow to rest for 20-30 minutes before carving and serving. The skin will be the crispiest right out of the oven so make sure to sneak a few crispy bites when nobody is looking.
Notes
See this salt conversion chart from Spruce Eats if you are not using diamond crystal kosher salt
- Prep Time: 20 minutes plus refrigeration
- Cook Time: 1-2 hours
- Category: dinner, Thanksgiving, poultry
- Method: roasting
- Cuisine: American
Food safety
- Cook to a minimum temperature of 165 °F (74 °C)
- Do not use the same utensils on cooked food, that previously touched raw meat
- Wash hands after touching raw meat
- Don't leave food sitting out at room temperature for more than 2 hours
Leave a Rating and Review!