
This Cara Cara Orange Scone recipe is a celebration of winter citrus fruit. A celebration of one of my favorite winter citrus fruits, to be more precise. Can you imagine winter without citrus? I can't. Just the smell of an orange being peeled immediately transports me to my childhood Christmases.
My love of winter citrus fruit is firmly planted in my psyche undoubtedly because Santa always left oranges in our stockings, (thanks, Santa!). I think this used to be a bigger tradition than it is now, although I did have a chat with a super-friendly produce lady at Wegmans one day who said she also used to get oranges in her stocking. So maybe it wasn't just my family? Anyway, I walked away from that conversation with a big box of satsuma oranges, still with their pretty green leaves attached. I'm a sucker for those seasonal beauties! And for Cara Caras, which are the star of this Cara Cara Orange Scone recipe.
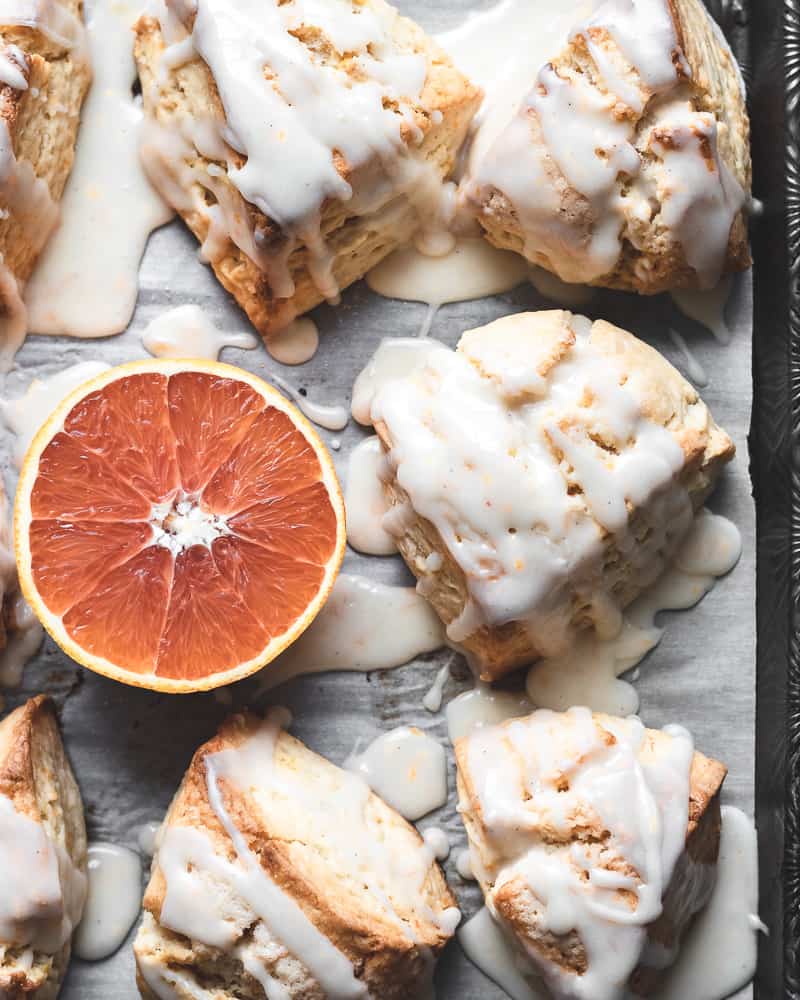
When you live in the Northeast like we do, there's really no such thing as fresh fruit in the winter months. Sure, you can find fruit at the store, but do you really want to eat those crunchy strawberries? No. You don't. Lucky for all of us, there is always a nice selection of various citrus fruits and Cara Caras are one of my favorites. With the prettiest, peachy-hued flesh, they are so sweet with just enough tartness and always so juicy.
My friend Sam from the blog Buttermilk by Sam has a mutual love for Cara Caras and I just have to share her beautiful recipe for Cara Cara Orange Meringue Tart - it is stunning.


This post and recipe were originally published February 21, 2019. They have been updated on January 21, 2021 with new photos, recipe card, and a bit more text.
My Cara Cara Orange Scone Recipe
I really wanted to showcase the loveliness of Cara Cara Oranges in a baking recipe and since I've been on a bit of a scone bender lately, these Cara Cara Orange Scones were happily born.
These scones use a basic cream scone recipe which I modified just slightly by adding zest and juice to amp up the orange flavor. A cream scone is unique in that it does not use butter (I know; who am I??) or eggs. It is a lovely, simple, blank canvas.
I added some cream cheese to my basic scone glaze along with some orange zest and juice to really push them over the top. They are so good. If you loved/love Orange Julius or dreamsicles (creamsicles?) you will love these.
The vanilla is also a key player here in the scone and the glaze. It pairs so well with the orange flavor. If you can, use vanilla bean paste for those little flecks that you know I adore! Oh, and I feel I must mention - if you wanted to add some cranberries that would be really good. Or some chopped fresh rosemary. Or both.
This Cara Cara Orange Scone recipe is perfect for chasing those winter blues away. Add it to your weekend or snowy day baking list and let me know if you make them!
Happy scone baking! xo - Anita

Check out these other scone recipes!
Triple Berry Crème Fraîche Scones
Print
Cara Cara Orange Scones
This Cara Cara Orange Scone Recipe is a celebration of winter citrus fruit with zest and juice in the dough and in the glaze!
- Total Time: 45 minutes
- Yield: 12 scones
Ingredients
- 2 cups all purpose flour
- 1 cup cake flour
- 1 tablespoon baking powder
- 1 teaspoon kosher salt
- ¼ cup granulated sugar, plus more for sprinkling tops of scones before baking
- 1 ½ cups heavy cream or whipping cream (I've used half and half in a pinch), plus more for brushing on scones before baking
- 4 tablespoons or ¼ cup fresh cara cara orange juice with as many pulpy bits as you can squelch out
- 1 teaspoon vanilla extract or vanilla bean paste
- zest from one (clean) cara cara orange (save a little for the glaze)
glaze:
- 2 tablespoons cream cheese at room temperature
- 2 cups powdered sugar
- 2 tablespoons fresh cara cara orange juice
- 1 teaspoon cara cara orange zest
- ½ teaspoon of vanilla extract or vanilla bean paste
- 1-2 tablespoons milk (just enough to make a smooth, pourable glaze)
Instructions
To make the scones:
- In a medium sized mixing bowl, whisk flours, baking powder, salt, and sugar. Set aside.
- In a spouted large measuring cup or small bowl, combine cream, orange juice and pulp, vanilla, and zest and stir to combine.
- Pour the cream mixture slowly over dry ingredients while gently mixing with a fork. You want a wet, craggy dough with no dry patches or flour still at the bottom of the bowl. You don't, however, want something as wet as muffin batter. Once you pour all of the cream in, use your hands to gently squish the dough into a ball. If it holds together you're good to go. If not, add just a bit more cream, a tablespoon at a time until you have a cohesive dough.
- Divide dough into two equal portions and on a floured surface, very gently shape into about a 5 inch circle. Pat down the top to make it fairly flat - not domed.
- Transfer both dough discs to a parchment lined baking sheet and place in freezer for at least 30 minutes. Alternatively, you can refrigerate for an hour or even overnight. If you're doing overnight make sure to cover them with plastic wrap or stash in a ziploc bag so they don't dry out.
- 30 minutes before you're ready to bake the scones, preheat oven to 400 degrees F.
- After dough has chilled, remove from fridge or freezer, and with a very sharp knife, slice your dough discs into 6 equal wedges.
- Place on baking tray about 1-2 inches apart.
- Brush tops with a generous amount of cream and sprinkle with sugar.
- Place in preheated oven for 20-25 minutes until just beginning to brown around edges and no wet dough remains in center of scone. If tops begin to brown too much, cover loosely with foil during last 10 minutes.
To make the glaze:
- Place cream cheese, powdered sugar, orange juice, zest, and vanilla in a medium bowl. Whisk to combine. Add just enough milk to thin mixture to a slow, pourable glaze. About the consistency of cool honey. You want it to glaze the scones, not just slither off the sides and all over your cookie sheet.
- When scones are done baking, remove from oven and let cool on tray for about 10-15 minutes before glazing. If you can't restrain yourself (like us), just enjoy them hot from the oven with some glaze on the side for dipping and drizzling. They are also crazy good split open and smeared with salted butter.
Notes
I wrote this recipe for Cara Cara oranges, but feel free to use any type of orange, or any citrus fruit for that matter.
The scones can be frozen after cutting in step 7. After cutting, place on parchment lined baking tray, making sure scones are not touching one another. Place in freezer. Once frozen, transfer to airtight container or ziploc bag and bake straight from the freezer as needed.
- Prep Time: 20 minutes
- Cook Time: 25 minutes
- Category: scones, breakfast
- Method: baking
Mik says
Costco just published this exact recipe in their Costco connection last month. I think they swiped it from you!
anita | wild thistle kitchen says
They sure did! Shame on them! Thanks for bringing this to my attention!
Lindsay says
Just made these using blood oranges, and blended two whole (peeled) blood oranges rather than juicing them, to retain the fiber in the pulp (2 blended was enough for the batter and the glaze). They are pillowy, delicious, and perfect for a January Sunday morning. The blood orange pulp makes the glaze a pretty pink.
Sarah says
I made these tonight with Blood Oranges and am in love! I've tried several scones recipes and methods but only Anita's have been successful for me! All 3 of hers that I've tried have been absolutely delicious! Simple and unfussy, I feel like I need to bake scones once a week now
I love that I get to use my cake flour here, LOVE LOVE that it's packed with orange zest+juice+pulp, and L O V E that you only have ¼ cup sugar in the dough! Perfect recipe!
anita | wild thistle kitchen says
Sarah! My sweet Sarah. How did I miss this?? We've all been under the weather for what seems like an eternity, that's how! LOL. But thank you so much for this. I'm sure the blood orange made them so beautiful!! xoxoxo
Sabrina says
Hi Anita!
Thanks for this recipe! This is The. Best. Scone. Recipe. Ever! My family ate them up so quickly that I wished I made a second batch. This is definitely the only scone recipe I will use from now on and I’ve made many. Thank you for sharing!
anita | wild thistle kitchen says
Sabrina!! This makes me so happy!! Thank you for the kind feedback and review! I am thrilled this recipe worked out and that your family loved them!! xo - Anita
Tracy S says
I made w Meyer lemons and added poppyseeds! So soft and delicious!
anita | wild thistle kitchen says
Oh I love that variation! Sounds so delicious!! Thank you for the kind review! xo - Anita
Terri says
Are the recipe amounts correct? I followedthe amount of flour and cream( i used half & half) . It was way to sticky. It was stated in the recioe to put more crean if needed so the doygh would come together. If i added more 1/2 &1/2 it would have gotten much worst. I kept sprinkling it with more flour to try to get it workable . My hands and surrounding work area were a mess ohf sticky dough. I was able to actyally scrape it on a cookie sheet and put it in the freezer for 30 min. So i could cut it into scones.I never had such a mess in my life. I did bake them. They did not rise at all but they tasted ok ( more the texture of an english muffin.)what was wrong. I made your recipe because it had good reviews so no one else had my problem!
anita | wild thistle kitchen says
Hi Terri. I'm sorry you had these results and I truly am baffled. I've made these many times and they always turn out great and so have others as you can see by the comments. The only reason it would be such a sticky mess would be too much cream or not enough flour. Or using the wrong type of flour I suppose. Overmixing with your hands could also be a cause for stickiness. As I state in the recipe I just barely mix it together with a fork, not my hands. Either way, I am sorry you had this outcome and thanks for your feedback. - Anita
Sarah says
Terri, I had the exact same problem. Huge sticky wet mess. I'm trying them again... Instead of adding the juice, zest, and vanilla to the cream, I added that to the dry first. Then I measured out 1.5 c cream...I slowly added it to the dry mix until it came together just right. I ended up only needing 1 c. of cream! They're in the oven now and look perfect and smell delicious.
Ashley A. says
When you say 1/4 of fresh oj, is that juice from the cara cara oranges or just a regular orange?
Thank you : )
anita | wild thistle kitchen says
Hi Ashley! I just updated it to be more clear. This whole recipe revolves around Cara Caras (and my love for them, lol) BUT you can absolutely use regular oranges, or any other type of citrus fruit in this recipe. Let me know if you make them and thank you for your question! - Anita
Sue says
Oh these looks delicious! I've been wanting to make scones for a while now, but I'll give this one a go on the weekend! Btw - in Hungary we also got oranges and mandarins/tangerines from Santa.
anita | wild thistle kitchen says
Thank you Sue! I hope you will try them. And thank you for telling me! Such a sweet tradition!
Ana says
Really delicious sconces! The scones themselves are not too sweet and the icing is to die for. Perfect pair. Thank you for the recipe!
anita | wild thistle kitchen says
Thank you so much, Ana! I am so happy you made them and enjoyed them!!
Sam says
I cannot get over the fact that there's no butter in these! I made them this morning in one bowl and in 10 minutes. Such an easy recipe with thorough, simple instructions. They rose beautifully in the oven, they resemble a sweet biscuit and of course, they taste absolutely wonderful! I particularly loved that you keep the pulp as it adds to the flavor. Thank you for this winner Anita!
anita | wild thistle kitchen says
Sam! Thank you!! Means the world coming from you! You know I LOVE butter, but isn't this such a nice, simple recipe? Reminds me of something I'd have at a tea party. Haha. So happy you made them!! xo - Anita
Jess says
Anita, these scones look delicious. You've got some great height on those babies. Well done!
anita | wild thistle kitchen says
Thank you so much!! They are a favorite around here! xo